| Author |
 Topic Search Topic Search  Topic Options Topic Options
|
Danner 
Guest


Joined: October 26 2007
Location: United States
Status: Offline
Points: 508
|
 Post Options Post Options
") Thanks(0) Thanks(0)
 Quote Quote  Reply Reply
 Posted: March 12 2008 at 10:46pm Posted: March 12 2008 at 10:46pm |
|
you always have the coolest threads i enjoy reading them keep it up.
Ryan
|
 |
Kynneke
Guest

Joined: March 04 2008
Location: North Ogden, UT
Status: Offline
Points: 579
|
Post Options
Thanks(0)
Quote Reply
Posted: March 13 2008 at 7:22am |
|
Beautiful tank! I just wanna know how you are going to aquascape, can you actually reach the bottom??
|
|
BobC63
Admin Group

Joined: January 17 2007
Location: Lehi, UT
Status: Offline
Points: 8964
|
Post Options
Thanks(0)
Quote Reply
Posted: March 13 2008 at 4:33pm |
I'm kicking around a few ideas on an aquascaping design  ... I can only reach the bottom if I basically put my arm in all the way past my shoulder - so, once the tank is full I won't be able to reach the sandbed without getting a bath - or using tongs...
Edited by carlso63 - March 13 2008 at 6:48pm
|
|
- My Current Tank: 65g Starfire (sitting empty for 2+ years) -
* Marine & Reef tanks since 1977 *
|
|
BobC63
Admin Group
Joined: January 17 2007
Location: Lehi, UT
Status: Offline
Points: 8964
|
Post Options
Thanks(0)
Quote Reply
Posted: March 13 2008 at 6:33pm |
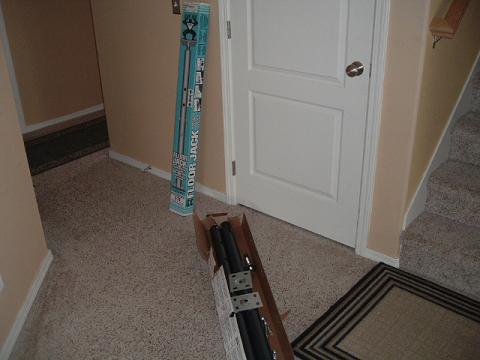
STEP 3: FLOOR SUPPORT 101
Today I took on the task of shoring up the flooring underneath the setup.
Opened up the floor jacks and started to pre-assemble them:
Simple enough; a couple of carriage bolts and a heavy duty screw riser for each jack post. I prepped everything I would need for the job - brought in my 2 concrete support blocks, the 8 ft 4X6 header post, a large wrench to turn the screw risers, a spotlight in case the single bulb down there wasn't bright enough (it wasn't).
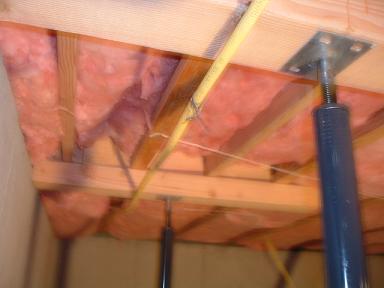
Went down inside the basement (technically a "crawlspace" since there is no floor other than dirt - but it's 7.5 feet deep down there) and discovered an issue I hadn't considered. The tank is sitting parallel to the floor joisting instead of perpendicular as I had (incorrectly) thought. That meant the entire weight of the setup would be spread over only 1 or maybe 2 joists  instead of 4 or 5... It also meant I would have to rethink the application of the single header post in a different direction.
What I decided was to cut the post into (2) 4 ft sections and run those perpendicular to the affected joist(s) and support each post with 1 floor jack. The floor joist closest to the wall is actually set upon the concrete foundation and fully supported its entire length, so I didn't have to worry about adding support to that one. The 2nd joist is 16" away and would bear the majority of the dead weight as it is the only joist directly under the setup. The 3rd joist is another 16" apart (32" from the foundation wall) and so ended up clearing the actual "footprint" of the stand by about 3 inches (the 24" wide stand is about 5" from the wall behind it), but having a 4ft post section meant I could support that joist as well. In all, I would be able to distribute the load stress over 3 joists using the posts and jacks vs. having almost 100% of the load on only 1 joist if I did not add any support... and IMO putting close to 2 tons of load on only 1 joist without any added support would be a bad, baaaad idea 
The end result looks like this:
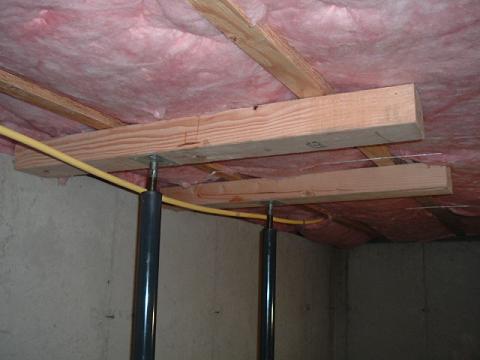
There are 3 joists total; the 1st is hidden by the foundation wall but is also fully supported by that wall. The 2nd is the major load-bearer because the tank is over that single joist alone. The 3rd clears the stand by maybe 3 inches but I have it supported by the header posts anyway since it will function to "assist" with bearing some of the stress. The floor jacks are not directly under the 2nd joist; they are offset about 2 inches because that is the measurement of the center of the tank (front to back) - but I may rethink that placement since the joist is the actual "contact point" for the load, and it might be smarter to orient the jacks directly under that 2nd joist rather than the exact numerical center of the load where there is no joist). The jacks are spaced 2 feet apart, meaning they are under the tank at the 2 ft mark and the 4 ft mark of the 6ft long tank... I got the distances by simply measuring the location of the tank upstairs and then marking it out on the foundation wall directly underneath.
The bottom of the jack posts are set upon 2 heavy concrete supports as shown here:
Here is a final shot of the whole set up:
All together I spent about 90 minutes setting everything up and tightening the screw risers and carriage bolts, and the total cost was under $100. I figured it's money well spent for peace of mind...
Edited by carlso63 - March 20 2008 at 1:41am
|
|
- My Current Tank: 65g Starfire (sitting empty for 2+ years) -
* Marine & Reef tanks since 1977 *
|
|
Mike Savage
Guest

Joined: July 15 2005
Location: Murray
Status: Offline
Points: 19173
|
Post Options
Thanks(0)
Quote Reply
Posted: March 13 2008 at 10:38pm |
Thanks for the pictures and the explanation.
Mike
|
|
|
|
troyholl
Guest

Joined: March 05 2006
Location: United States
Status: Offline
Points: 717
|
Post Options
Thanks(0)
Quote Reply
Posted: March 13 2008 at 11:16pm |
|
Sounds like you have it covered... you should be okay...
|
|
Troy Hollingsworth
Riverton, Utah
270 Gallon "Custom" Tank
|
|
BobC63
Admin Group
Joined: January 17 2007
Location: Lehi, UT
Status: Offline
Points: 8964
|
Post Options
Thanks(0)
Quote Reply
Posted: March 20 2008 at 1:38am |
Well not much has happened in the past week...
However, it looks like it's a "go" for a Utah Rock / Sand run this weekend - sunny w/ temp around 50 for Saturday...
Looking to score basically as much rock & sand as I can get into the back of my SUV...
With a little luck I should be able to build / install the plenum, sandbed & rock over the weekend (all with pics, of course  )
|
|
- My Current Tank: 65g Starfire (sitting empty for 2+ years) -
* Marine & Reef tanks since 1977 *
|
|
Corey Price
Guest

Joined: August 25 2004
Location: Farmington
Status: Offline
Points: 2567
|
Post Options
Thanks(0)
Quote Reply
Posted: March 20 2008 at 6:49am |
|
Alright, I feel like I better make a suggestion-
Please, please throw some blocking of the same depth that your joists are at the supports/shores you just installed. It will mean that you will need to pull some of the insulation out to get to it, but it will be better than having a joist roll over on that support.
The blocking could basically be a 2x10 or 2x12 cut to fit perpendicular to the joists, depending on the joist depth. You only would want them at the joists you've shored up.
|
|
Mike Savage
Guest
Joined: July 15 2005
Location: Murray
Status: Offline
Points: 19173
|
Post Options
Thanks(0)
Quote Reply
Posted: March 20 2008 at 8:27am |
Great idea Corey. I wouldn't have thought of that.
Mike
|
|
|
|
BobC63
Admin Group
Joined: January 17 2007
Location: Lehi, UT
Status: Offline
Points: 8964
|
Post Options
Thanks(0)
Quote Reply
Posted: March 20 2008 at 4:41pm |
Actually a very good idea Corey - Thanks!
I'll get back with the results...
|
|
- My Current Tank: 65g Starfire (sitting empty for 2+ years) -
* Marine & Reef tanks since 1977 *
|
|
fj40fax
Guest

Joined: November 04 2004
Location: United States
Status: Offline
Points: 1261
|
Post Options
Thanks(0)
Quote Reply
Posted: March 20 2008 at 5:54pm |
Looking good! You guys are welcome to use my trailer for the sand run if you can find someone with a hitch.
You have way more funriture than the last time I was there, 
Fax
|
|
Fax 318-3632
90g 2x250W 14kK MH
Sump, Fuge, G3, UV, O3, ACIII
Pleasant Grove, UT Across State Street from the Purple Turtle
Adjustments and Massages for Frags!
|
|
BobC63
Admin Group
Joined: January 17 2007
Location: Lehi, UT
Status: Offline
Points: 8964
|
Post Options
Thanks(0)
Quote Reply
Posted: March 20 2008 at 7:03pm |
 Corey Price wrote: Corey Price wrote:
Alright, I feel like I better make a suggestion-
Please, please throw some blocking of the same depth that your joists are at the supports/shores you just installed. It will mean that you will need to pull some of the insulation out to get to it, but it will be better than having a joist roll over on that support.
The blocking could basically be a 2x10 or 2x12 cut to fit perpendicular to the joists, depending on the joist depth. You only would want them at the joists you've shored up.
|
Guys, take a look at this pivc and tell me what you think:
The red outline represents the approx. footprint of the tank & stand. As you can see, the tank actually sits directly over only 1 joist The green lines represent where you suggest adding blocking to shore up the joists, correct?
The yellow lines represent what I was thinking of adding in addition to your suggestion. I was thinking of building 2 X 4 "U frames" on both ends of my header posts to provide support directly to the ground. I am worried that the single metal screw jack on each side may function like a lever on the header posts and cause them to exert an upward force on either end of the posts. And this way I 'll have 6 contact points with the basement floor and 6 places to disttribute the weight instead of only 2...
And then adding additional 2 X 10 blocking close to the ends of the footprint - just to be safe.
What do you think? Overkill, or a good idea?
What I am really trying to avoid is having to relocate the tank upstairs to run perpendicular to the joists unless I really have to for safety...
|
|
- My Current Tank: 65g Starfire (sitting empty for 2+ years) -
* Marine & Reef tanks since 1977 *
|
|
Corey Price
Guest
Joined: August 25 2004
Location: Farmington
Status: Offline
Points: 2567
|
Post Options
Thanks(0)
Quote Reply
Posted: March 20 2008 at 7:21pm |
|
I think what you have done is fine as it is, just throw some blocking in where you were showing it. The tributary load to each joist is different, so centering the screw jacks on the tank footprint would only help. The jacks with blocking will probably be just fine- you're forgetting that the floor joists are stiff enough to prevent the lever arm you're thinking about.
|
|
BobC63
Admin Group
Joined: January 17 2007
Location: Lehi, UT
Status: Offline
Points: 8964
|
Post Options
Thanks(0)
Quote Reply
Posted: March 20 2008 at 7:29pm |
OK, cool, I appreciate the suggestions -
I'm not worried that the tank would literally "fall through the floor"; I am concerned that the stress would show up as a sagging floor or excess deflection, or even a crack in the wall behind the tank  |
|
- My Current Tank: 65g Starfire (sitting empty for 2+ years) -
* Marine & Reef tanks since 1977 *
|
|
DeepFriedOprah
Guest

Joined: February 10 2008
Location: Eagle Mountain
Status: Offline
Points: 771
|
Post Options
Thanks(0)
Quote Reply
Posted: March 21 2008 at 12:59am |
|
PM Sent
|
|
BobC63
Admin Group
Joined: January 17 2007
Location: Lehi, UT
Status: Offline
Points: 8964
|
Post Options
Thanks(0)
Quote Reply
Posted: March 24 2008 at 8:19am |
Here's a couple of pics of the "upgraded" reinforcement of the floor:
This one's a little clearer
You can see where I added 2 additional 6 foot 2X12s to serve as extra joists under the tank... this means there are now 3 joists under full load (instead of just the 1) and 2 more joists under partial load, for a total of 5 supporting joists. I also added 2X12 'blocking' perpendicular to the joists to prevent any joist twisting or rolling under the load (as Corey had suggested)
Looks like we can move on to the next step in the build... 
|
|
- My Current Tank: 65g Starfire (sitting empty for 2+ years) -
* Marine & Reef tanks since 1977 *
|
|
BobC63
Admin Group
Joined: January 17 2007
Location: Lehi, UT
Status: Offline
Points: 8964
|
Post Options
Thanks(0)
Quote Reply
Posted: March 24 2008 at 9:22am |
Step #4: Installing a Plenumed Sandbed
Now that the floor is adequately supported, I can start adding weight to the tank.
First thing that goes in (all my tanks, anyway ) is the plenum. A few have asked me to "show how to make a plenum", so here goes...
A) Parts List
- 'Eggcrate' (flourescent light diffuser panels) 48" X 24"; Home Depot, $11.89 each
- Fiberglass window screen, not aluminum or "pet screen"; Home Depot, $6.49 a roll
- PVC elbows, either 1/2", 3/4", or 1" diameter (depends on tank size); Home Depot, $1.79 / bag
I'm sure Lowe's or Ace Hardware would carry all the supplies you need as well.
So, in my case, the plenum for my 225g cost around $40. Smaller tanks are (of course) cheaper to do; a 4' X 2' X 2' 120g (or smaller) is usually under $25...
Here's a pic of all the parts:
B) Place PVC elbows on tank bottom to act as 'supports' for the plenum base. I like to use elbows rather than straight PVC because they can't roll around the bottom and don't need to have any holes drilled into them to allow for water to flow... the diameter depends on tank size and how high / deep a plenum space you want under your sandbed. On a large tank like this, I use full 1" elbows. On tanks of 75 - 125g, I would use 3/4"... less than 75g I would use 1/2" elbows. Arrange your elbows about 5" apart to make sure you have adequate and even support for the eggcrate (which acts as your plenum base). Some folks use plastic ties to secure their PVC to the eggcrate; again, if you use elbows instead you don't need to do that. Just arrange them like this:

C) Next, cut your eggcrate to fit your tank bottom. A regular rectangular tank is a pretty easy fit. This tank, with the "Reef Ready" overflow built in, was a little more work. You can use any type of tin snip or heavy scissor to cut the eggcrate. Just measure carefully and cut slowly so you don't snap the eggcrate. Place the eggcrate right on top of your PVC elbows:
I needed to use 2 pieces on the 225. Here is the completed plenum base:
D) Now, roll out your fiberglass screening and cut to fit over the plenum base. You want to leave an extra inch or so on all sides to allow the screen to hang over the base and prevent any of the sandbed from getting under the base and filling in the void space you are making between the plenum base and the tank bottom glass. Again, the "Reef Ready" tank is a little more complicated than a normal rectangular tank... just take your time. Fit the screening right over the eggcrate like so:
E) Now add your clean rinsed sand right over the screening. Don't let it "plop in" as you don't want to move or bunch up the screening:
I use what is called a "bilayer plenum" which means 2 separate layers of sand with screening in between. You can use 2 different granule sizes of sand if you like; a coarser aragonite for the first (lower) layer, with a finer grained sand up top. I used the same Utah oolitic sand for both layers (cause I got plenty of it for free - and I'm cheap )... either way is OK. The bottom layer should be about 2" - 2.5" deep:
F) Once the bottom layer is in and relatively flat, cut a 2nd layer of screening to go over the bottom layer of sand. This screen does not need to be oversized at all; it just separates the 2 sand layers like so:
The function of this second screen is to keep all your crabs, snails, stars, cukes, burrowing fish, etc. - anything larger than a baby pod, basically - keeps them from disturbing the bacteria in the bottom sand layer or introducing detritus into that sand... This lower layer ends up becoming full of that elusive denitrifying bacteria that turns your nitrates into free nitrogen, fed via the low oxygen, very low flow water that moves through the "void space" under your plenum base.
G) After installing the second screen, add another 2" or so of sand as your final layer:
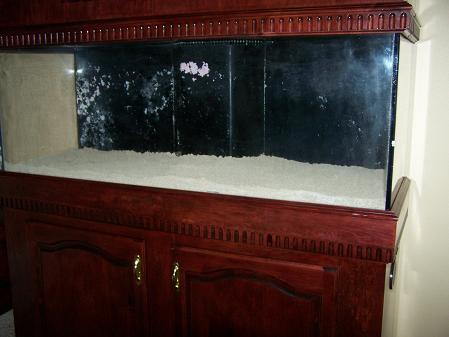
H) The finished plenumed sandbed. In my case, about 4.75" of sand over a 1.5" total plenumed space - or close to 6.25" total depth from top of sandbed to tank bottom glass:
Properly installed, this plenumed sandbed should last basically forever... No need to replace or "recharge" any of the sand like a DSB. And no worries about any possible hydrogen sulfide (HS2) buildup. Ever. because with a plenumed bed it just isn't possible... 
Maintenance-wise, there isn't much to it... should your fish or inverts burrow down to that second screen, you can just cover it back up... Some folks who advocate vacumming sandbeds would vacuum out that top layer periodically; you can if you want to - just be careful not to disturb that bottom layer... that's your dentrifying "money maker" , IYKWIM ...
Any questions?
Edited by carlso63 - April 15 2008 at 1:23am
|
|
- My Current Tank: 65g Starfire (sitting empty for 2+ years) -
* Marine & Reef tanks since 1977 *
|
|
MadReefer
Guest
Joined: December 13 2007
Location: Kearns
Status: Offline
Points: 1965
|
Post Options
Thanks(0)
Quote Reply
Posted: March 24 2008 at 1:03pm |
|
Very informative. Great pictures. You make it look easy. The only question I have- Is it better to leave it dry as you build it? To me it seems like you would have added some water after you add each layer.
|
|
BobC63
Admin Group
Joined: January 17 2007
Location: Lehi, UT
Status: Offline
Points: 8964
|
Post Options
Thanks(0)
Quote Reply
Posted: March 24 2008 at 5:37pm |
If the sand was "live" sand then, yes, you would need to kept it wet (aged SW, of course) otherwise the beneficial bacteria would die off...
With the "dead" sand I am using there is no need for water...
|
|
- My Current Tank: 65g Starfire (sitting empty for 2+ years) -
* Marine & Reef tanks since 1977 *
|
|
BobC63
Admin Group
Joined: January 17 2007
Location: Lehi, UT
Status: Offline
Points: 8964
|
Post Options
Thanks(0)
Quote Reply
Posted: March 26 2008 at 8:41pm |
Today I started toying with rockwork and thinking about ideas for aquascaping... I did place some rock and took a few pics - but I think I'll wait until it is all done to post them.
Originally , I was thinking of doing a "suspended Reef" (ala Dion) to but then I decided to modify it a bit and go for a "semi-suspended" look using only rock for support and no eggcrate or PVC "pillars". The goal being minimal contact between the rock and the sandbed. With the abundant supply of rock I collected I think I can make it work. Right now the rockwork "footprint" covers probably 60% of the bottom of the tank but the supporting rockwork actually contacts less than 10% of the sandbed (maybe as low as 5%)... this will create an even water flow throughout the sandbed and maximize the denitrifying potential as well - which means a higher sustainable bioload  I just have to remember to leave room in my design for all the LR from the 125 to fit in (most of it with corals and stuff stuck to it).
But here is where things will start to slow down on this build... since the objective is to transfer everything from the 125 to the 225, that means I still have to finish certain things before a transfer can take place. Meaning I have to plumb the tank, buy a sump, return pump, skimmer, and then I can fill the 225 and add salt, bring up the temp, align the water parameters to those of the 125, and then tranfer over all the livestock and be done with it.
Unfortunately right now the budget isn't there to fund all these purchases for maybe a month or two... so, barring an unforseen windfall, I can't go much further at the moment.
The good news is that when the funding does come through then I will probably be doing everything hardware-wise and filling the tank all within a few days. So, I just have to be patient until then...
|
|
- My Current Tank: 65g Starfire (sitting empty for 2+ years) -
* Marine & Reef tanks since 1977 *
|
|