| Author |
 Topic Search Topic Search  Topic Options Topic Options
|
Shane H 
Presidency


Joined: March 09 2003
Location: Brigham City
Status: Offline
Points: 7921
|
 Post Options Post Options
") Thanks(0) Thanks(0)
 Quote Quote  Reply Reply
 Topic: Frog Fish Experience - Build Thread Topic: Frog Fish Experience - Build Thread
Posted: January 02 2010 at 11:51am |
NEW YEAR, NEW TANK
I can't recall ever posting a build thread, so I thought I might document the assembly of my new tank setup - which I have named "The Frogfish Experience"
I chose a 20 gallon long based on the general area I have for this tank. It will be set up in my son's bedroom and I can't have too much room for fish! Also, the 20 gallon long is quite shallow which is perfect for fish that don't really swim (that often).
1. Components
* Standard 20 gallon long, center drilled for single overflow (thanks ADs)
* Custom sized overflow box (thanks ADs)
* Bulkhead (w/strainer)
* Over-the-top returns (x2)
* Tank dividers (x2) - (thanks ssilcox)
My first step in the build was to install the overflow box. I debated whether to install the dividers first because there is somewhat limited space to work in such a small aquarium. But in the end, I chose the overflow box. I chose to install the overflow dead center for reasons that should become apparent later.
2. Overflow Installation
* I measured and masked the area for the overflow. Notice that I didn't mask the interior side of the overflow. I wanted clean lines on the exterior, but was unconcerned about the inside. This area will not be seen and other than the bulk head seal, was of little concern.
* Many people are overly concerned about what silicone to use for aquarium projects. I use 100% silicone from the cheapest source I can find. Once dry, it is inert and will not react to the SW. (sorry about the pic)
* After applying a healthy amount of silicone to both the interior and exterior of the overflow, (and most definately the intimate surfaces) I removed the mask, before the silicone began to set at all. The project was then set aside for 24 hours. I used a regular brick for a bit more weight on the overflow.
A couple more comments about the overflow installation.
* By masking the area to be siliconed, I obtained very clean lines. This is not necessary (just look at the glass to glass joints on many professionally assembeled aquariums). But I think it gives it a much better look. If you do this yourself, you must remove the mask as soon as possible. If the silicone begins to set at all, this crisp look will be ruined as the silicone will not separate cleanly at the mask line.
* I mentioned that the interior was of little concern. I should explain that the contact area of the bulkhead seal is very important and no silicone should contaminate this area. This is very important to achieve and maintain the seal and prevent leaks.

I should have mentioned, the intent of this tank is to house multiple frogfish in a single aquarium, while keeping them isolated. The point is to maintain fish that will ordinarily eat one another in single system, without the worry of predation from their tank mates.
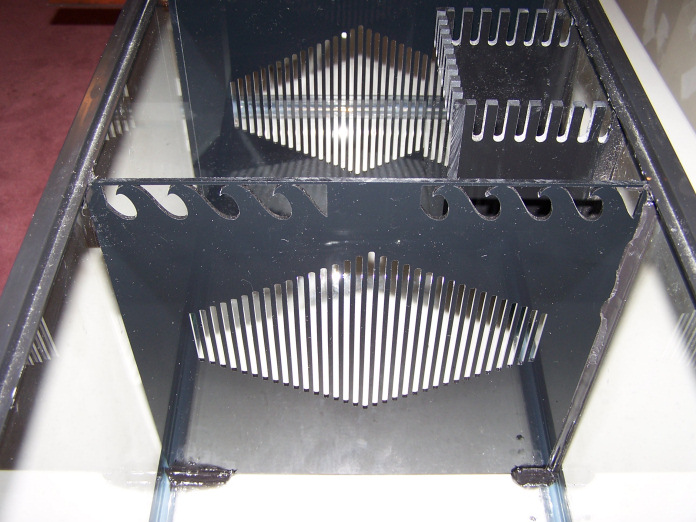
I also wanted something a bit "cooler" than usual. I picked up some 1/8 inch, black acrylic from Regional Supply (cut to size) and delivered it to a good friend for a bit of customization. (Laser cut customization) I told him what I was looking to do and gave him the creative discretion to get it done. What I ended up with are some very cool, very unique dividers that will do exactly what I intended and look super cool to boot!
3. Divider Installation
* Acrylic divider ready to install. I left the protective paper in place during the entire installation. This was a mistake. It was much more difficult to remove than I anticipated, and I messed up my "crisp" silicone joints. But, in the end they will be virtually invisible anyway - more later.
* I installed two dividers, creating three chambers. This effectively divides the aquarium into three identical tanks - sharing the same water, sand bed and lighting system.
I used the same black silicone and mask method on the rear of the aquarium. The front side was left without silicone. I wanted to limit the amount of viewing area lost due to the joint. There is a small amount of space between the divider and the glass, which I hope will allow me to scrape algae using a razor blade and maintain this look.
* I used copious amounts of silcone in the front corners that are hidden by the aquarium frame. This will hold the divider in place in lieu of a joint along the front glass. There is about a 1/2 inch gap at the bottom that will allow a continuous sand bed throughout the aquarium. I'm not sure this is at all necessary, but will provide additional continuity in the aquarium.
* Looking at the front of the aquarium, the dividers look very clean. The "gobs" of silicone that are currently visible are inboard on the bottom of the tank and will be completely covered with the substrate.
I should note that I chose 1/8" acrylic based on the laser cut. As I understand it, thicker acrylic will melt and the clean lines are not possible - at least with the equipment my friend uses. Also, since water will be present in equal height on either side of the dividers, there should be equal pressure and the divider will not flex.
Edited by Shane H - January 02 2010 at 1:22pm
|
 |
Shane H
Presidency
Joined: March 09 2003
Location: Brigham City
Status: Offline
Points: 7921
|
Post Options
Thanks(0)
Quote Reply
Posted: January 02 2010 at 12:09pm |
Consolidated ...
Edited by Shane H - January 02 2010 at 1:20pm
|
|
Shane H
Presidency
Joined: March 09 2003
Location: Brigham City
Status: Offline
Points: 7921
|
Post Options
Thanks(0)
Quote Reply
Posted: January 02 2010 at 12:24pm |
Consolidated ...
Edited by Shane H - January 02 2010 at 1:21pm
|
|
Shane H
Presidency
Joined: March 09 2003
Location: Brigham City
Status: Offline
Points: 7921
|
Post Options
Thanks(0)
Quote Reply
Posted: January 02 2010 at 1:08pm |
Consolidated ...
Edited by Shane H - January 02 2010 at 1:21pm
|
|
jwoo
Presidency
Joined: April 29 2009
Location: Alpine
Status: Offline
Points: 3603
|
Post Options
Thanks(0)
Quote Reply
Posted: January 02 2010 at 1:43pm |
|
This looks awesome Shane! I love the idea of the dividers so that the frogs don't eat each other. Are you going to relocate the one in the 3.5 gallon and get two more?
|
|
None at the moment
Soon: 72 Gallon Bowfront
|
|
Shane H
Presidency
Joined: March 09 2003
Location: Brigham City
Status: Offline
Points: 7921
|
Post Options
Thanks(0)
Quote Reply
Posted: January 02 2010 at 2:07pm |
Are you going to relocate the one in the 3.5 gallon and get two more?
Exactly!
|
|
bfessler
Guest


Joined: March 13 2009
Location: Lehi
Status: Offline
Points: 1708
|
Post Options
Thanks(0)
Quote Reply
Posted: January 06 2010 at 8:00am |
Great project Shane.
Thanks for consolidating the thread. I have added it to the quick reference topic under general posts.
|
Burt
An equal opportunity reefer,
I support all hobbyists and organizations involved in Marine Aquarium Keeping.
[email protected]
|
|
Nick801
Guest

Joined: July 03 2008
Location: Sandy
Status: Offline
Points: 4155
|
Post Options
Thanks(0)
Quote Reply
Posted: January 06 2010 at 9:56am |
|
Shane whats the reason you can't keep all 3 together? is there a huge size difference?
|
|
|
|
Shane H
Presidency
Joined: March 09 2003
Location: Brigham City
Status: Offline
Points: 7921
|
Post Options
Thanks(0)
Quote Reply
Posted: January 06 2010 at 10:22am |
|
Nick - its just too risky. They have a propensity to eat whatever they "think" will fit in their mouth. Even if they are comparable in size, there is a large chance that one will eat another, or that they will both die in the attempt.
|
|
Nick801
Guest
Joined: July 03 2008
Location: Sandy
Status: Offline
Points: 4155
|
Post Options
Thanks(0)
Quote Reply
Posted: January 06 2010 at 11:15am |
|
Ah well the build looks awesome so far =) who cut your dividers for ya? thats really cool
|
|
|
|
Luckedout
Guest

Joined: October 11 2009
Location: Layton
Status: Offline
Points: 1495
|
Post Options
Thanks(0)
Quote Reply
Posted: January 06 2010 at 12:02pm |
|
Why did you go with black dividers instead of clear?
|
|
-Ben
90g Mixed reef
www.body-balancechiropractic.com
|
|
Shane H
Presidency
Joined: March 09 2003
Location: Brigham City
Status: Offline
Points: 7921
|
Post Options
Thanks(0)
Quote Reply
Posted: January 06 2010 at 8:57pm |
who cut your dividers for ya? thats really cool
ssilcox (Shane)
Why did you go with black dividers instead of clear?
I figured the dividers would become covered with coraline over time anyway, and the black was more aesthetic than the clear - especially as they become encrusted with algae. I also thought the black would blend into the background better and be less obvious. Other than that, there wasn't much thought to it. I suppose we'll see if it was a good choice in a few months!
|
|
bfessler
Guest
Joined: March 13 2009
Location: Lehi
Status: Offline
Points: 1708
|
Post Options
Thanks(0)
Quote Reply
Posted: January 06 2010 at 10:30pm |
 Shane H wrote: Shane H wrote:
Why did you go with black dividers instead of clear?
I figured the dividers would become covered with coraline over time anyway, and the black was more aesthetic than the clear - especially as they become encrusted with algae. I also thought the black would blend into the background better and be less obvious. Other than that, there wasn't much thought to it. I suppose we'll see if it was a good choice in a few months! |
I think it was a good decision. It will be hard to keep those slots clean and clear acrylic would really show anything growing on them.
|
Burt
An equal opportunity reefer,
I support all hobbyists and organizations involved in Marine Aquarium Keeping.
[email protected]
|
|
Shane H
Presidency
Joined: March 09 2003
Location: Brigham City
Status: Offline
Points: 7921
|
Post Options
Thanks(0)
Quote Reply
Posted: January 06 2010 at 10:34pm |
I chose to use this as my sump. It was originally a wet/dry trickle filter I used back in the day. I will use the skimmer, although it is not terribly efficient. The second chamber will be partially filled with LR rubble. There will be no macro algae and no light over the sump. I plan to keep macro in the display and do not want to compete in the sump.
I'm planning to use a Mag 3 for the return and all water movement. Plumbing posts to come!
|
|
Shane H
Presidency
Joined: March 09 2003
Location: Brigham City
Status: Offline
Points: 7921
|
Post Options
Thanks(0)
Quote Reply
Posted: January 06 2010 at 10:41pm |
The sump return was originally plumbed using 1 1/4 inch flex tubing, so I figured - why not. The bulk head is 1 inch, so I had to add a bushing to upsize. I also added a ball valve to control how rapidly the overflow drains. By controlling the slow, you can eliminate the "slurping" sound that is prominent with this type of drain. If necessary, I will drill a hole in the elbow and install an airline - I hope this is not necessary!
The return is 1/2 inch tubing. I chose not to hard plumb this tank because the distance from the return pump to the top of the aquarium is quite short. Also, I had the tubing on hand. I divided the 1/2 inch return with a simple 't' and used store bought over-the-top style tubes to direct the return into each of the outside chambers.
I used plumbers tape to attach the return tubing to the stand. This keeps everything in place and provides a clean look to the plumbing. Be aware this can cause a some vibration noise and may have to be "tweaked" a bit if the pump noise is transferred through the tubing.
I also used hose clamps on all the barbed fittings. This probably isn't necessary, but I want to make sure there are no leaks and no catastrophic events, should a hose separate.
BTW - I think plumbers tape (which really isn't tape at all) is one of the most handy tools for DIY projects. I've used it to create hangers for ballasts, organize wires, to secure plumbing (intended use), to hang speakers, repair bicycles, etc. Keep in mind that is will rust. It is galvanized, but - when exposed to SW - you know.
Edited by Shane H - January 06 2010 at 11:03pm
|
|
MadReefer
Guest
Joined: December 13 2007
Location: Kearns
Status: Offline
Points: 1965
|
Post Options
Thanks(0)
Quote Reply
Posted: January 06 2010 at 11:05pm |
|
Very cool!
|
|
Corey Price
Guest

Joined: August 25 2004
Location: Farmington
Status: Offline
Points: 2567
|
Post Options
Thanks(0)
Quote Reply
Posted: January 06 2010 at 11:08pm |
|
Shane,
They sell plumber's tape in plastic as well, in case you wanted to know. Looks cool, by the way.
|
|
Shane H
Presidency
Joined: March 09 2003
Location: Brigham City
Status: Offline
Points: 7921
|
Post Options
Thanks(0)
Quote Reply
Posted: January 06 2010 at 11:08pm |
I forgot to mention - I painted the back of the aquarium gloss black. Nothing ruins the look of a nice tank faster than being able to see the power chords, plumbing, or whatever through the back of the tank. I
I chose black to match the other components (stand, light, dividers, tank). It does give the tank a bit darker look than, say, a light blue. But given the inhabitants, a darker look is appropriate.
|
|
Shane H
Presidency
Joined: March 09 2003
Location: Brigham City
Status: Offline
Points: 7921
|
Post Options
Thanks(0)
Quote Reply
Posted: January 06 2010 at 11:10pm |
They sell plumber's tape in plastic as well, in case you wanted to know
Yeah - but it doesn't hold a bend nearly as well! Good point though!
|
|
Corey Price
Guest
Joined: August 25 2004
Location: Farmington
Status: Offline
Points: 2567
|
Post Options
Thanks(0)
Quote Reply
Posted: January 06 2010 at 11:16pm |
|
No, the plastic tape doesn't. I used it for my last tank, and it worked great.
Some plumber thought that it was an acceptable seismic strap for my water heater. Sheesh- good thing I replaced it.
So when are you going to put fish in?
Edited by Corey Price - January 06 2010 at 11:17pm
|
|