| Author |
 Topic Search Topic Search  Topic Options Topic Options
|
GentlemanBean 
Guest


Joined: April 19 2008
Location: Murray
Status: Offline
Points: 592
|
 Post Options Post Options
") Thanks(0) Thanks(0)
 Quote Quote  Reply Reply
 Topic: 140 gallon build - Updated 09/30 Topic: 140 gallon build - Updated 09/30
Posted: June 02 2011 at 1:14am |
Although I've been planning it for a while, I though I'd start an official thread for my new tank build.
I have had the skimmer for a while, one of Elite Aquatic's (tcfab's) CS-150 cone skimmers. I just barely ordered the tank from The Aquarium and picked up the lumber for the stand. Tomorrow I will start on the frame for the stand. It will be built using the guidelines form this reefcentral thread.
The tank will be a 140 gallon from deep sea aquatics which has the following dimensions: 48.5x24.5x29
I'm getting the "Show" model that comes undrilled and I'll be adding a coast to coast overflow with a bean style overflow.
I'll be using all schedule 80 plumbing, a reeflow dart for return, 40w Emperor Aquatics UV sterilizer, 40 gallon breeder for a sump (this may change), two Vortech MP40s and two Aqua Illumination Sol Blue fixtures for lighting.
From my old tank I'll be reusing my Neptune Systems Apex controller, 1 MP40 and my Precision Marine calcium reactor.
Wish me luck!
Edited by GentlemanBean - September 30 2011 at 11:07pm
|
|
|
 |
tcfab
Guest

Joined: October 18 2008
Location: North Ogden
Status: Offline
Points: 1480
|
Post Options
Thanks(0)
Quote Reply
Posted: June 02 2011 at 7:41am |
awesome, looking forward to some pics 
|
|
Need custom acrylic work? give me a call, www.Elite-Aquatics.net (801)645-6386
|
|
WhiteReef
Paid Member


Joined: September 03 2002
Location: Magna, UT
Status: Offline
Points: 1014
|
Post Options
Thanks(0)
Quote Reply
Posted: June 02 2011 at 9:27am |
|
Sounding great and I too am looking forward to some pics!
|
|
----------------
Richard
Former 47G Column Reef, Magna
20" x 18" x 31"H
|
|
Jeremyw
Guest

Joined: April 09 2009
Location: Utah County
Status: Offline
Points: 8513
|
Post Options
Thanks(0)
Quote Reply
Posted: June 02 2011 at 10:16am |
|
Sweet cant wait to see it!
|
|
sunflashx
Guest
Joined: January 21 2011
Status: Offline
Points: 103
|
Post Options
Thanks(0)
Quote Reply
Posted: June 02 2011 at 4:05pm |
 GentlemanBean wrote: GentlemanBean wrote:
I'm getting the "Show" model that comes undrilled and I'll be adding a coast to coast overflow with a bean style overflow.
Wish me luck! |
Here's a pretty great example of a Coast to Coast w/Bean overflow if you haven't seen it yet. http://www.glassreef.com/basics_overflow.php
GentlemanBean wrote:
I just barely ordered the tank from The Aquarium and picked up the
lumber for the stand. Tomorrow I will start on the frame for the stand.
It will be built using the guidelines form this reefcentral thread. |
I'm not sure what your plan is there, but if I were me, I'd buy LVLs from Home Depot or wherever. Home Depot LVL9.5" seems to be a common height, run those through a table saw and halve them. I built my sump stand out of off the shelf dimensional lumber and I wouldn't ever do it again for a tank stand. I did the math for a standard size 180 I'd liek to move to, and unless I screwed something up, the frame is roughly $150 or less to build from engineered wood.
Edited by sunflashx - June 02 2011 at 4:08pm
|
|
|
|
GentlemanBean
Guest
Joined: April 19 2008
Location: Murray
Status: Offline
Points: 592
|
Post Options
Thanks(0)
Quote Reply
Posted: June 02 2011 at 4:45pm |
I tend to be slightly obsessive and I have read so many different threads on Bean style overflows. I've already got everything completely planned out even though I don't even have the tank yet.  I originally wanted to get a custom tank with an external overflow box but in the end, I couldn't justify the cost since DSA had a stock tank that was the dimensions I was wanting. Consequently I'll have an internal c2c (or near c2c) overflow and it will be drilled from the back with three schedule 80 bulkheads. < ="utf-8">
sunflashx wrote:
I'm not sure what your plan is there, but if I were me, I'd buy LVLs from Home Depot or wherever. Home Depot LVL9.5" seems to be a common height, run those through a table saw and halve them. I built my sump stand out of off the shelf dimensional lumber and I wouldn't ever do it again for a tank stand. I did the math for a standard size 180 I'd liek to move to, and unless I screwed something up, the frame is roughly $150 or less to build from engineered wood. |
I'm going with standard stud lumber 2x4s and 2x6s for the stand. It is cheap and will be more than strong enough. I plan to use a paint for the frame that will stand up to the marine environment.
Thanks everyone for the comments and suggestions!
|
|
|
|
sunflashx
Guest
Joined: January 21 2011
Status: Offline
Points: 103
|
Post Options
Thanks(0)
Quote Reply
Posted: June 02 2011 at 5:32pm |
GentlemanBean wrote:
I'm going with standard stud lumber 2x4s and 2x6s for the stand. It is cheap and will be more than strong enough. I plan to use a paint for the frame that will stand up to the marine environment.
Thanks everyone for the comments and suggestions! |
It's not a strength thing, it's a straight, square, and level sort of thing. I picked through the wood, and built it on a flat level surface and when it all went together, my wood was definitely not straight or without twist. Maybe I'm just a bad carpenter, and engineered wood would cover my weaknesses. 
|
|
|
|
GentlemanBean
Guest
Joined: April 19 2008
Location: Murray
Status: Offline
Points: 592
|
Post Options
Thanks(0)
Quote Reply
Posted: June 02 2011 at 5:44pm |
sunflashx wrote:
It's not a strength thing, it's a straight, square, and level sort of thing.
I picked through the wood, and built it on a flat level surface and when it all went together, my wood was definitely not straight or without twist. Maybe I'm just a bad carpenter, and engineered wood would cover my weaknesses.
|
Ahhhh I see what you're saying. That is something I hadn't even considered. I'll be sure to check that after I complete the frame and I may make other plans if it is too out of whack. Thanks for the heads up!
|
|
|
|
sunflashx
Guest
Joined: January 21 2011
Status: Offline
Points: 103
|
Post Options
Thanks(0)
Quote Reply
Posted: June 02 2011 at 6:05pm |
|
The back edge of my sump stand ended up low where it contacted the tank frame, too small of a gap to shim, and I wasn't sure I could shim it evenly along the length without torquing it some, so I ended up taping off the tank and the stand (hopefully to avoid the tank being completely glued down to the stand) and then set the empty tank in a bed of silicone along the back seam.
I would have scrapped the thing if it had been for my display, but it sits over a floor drain on bare concrete... The sump was also only ever going to be like 2/3 full.
|
|
|
|
GentlemanBean
Guest
Joined: April 19 2008
Location: Murray
Status: Offline
Points: 592
|
Post Options
Thanks(0)
Quote Reply
Posted: June 04 2011 at 10:09am |
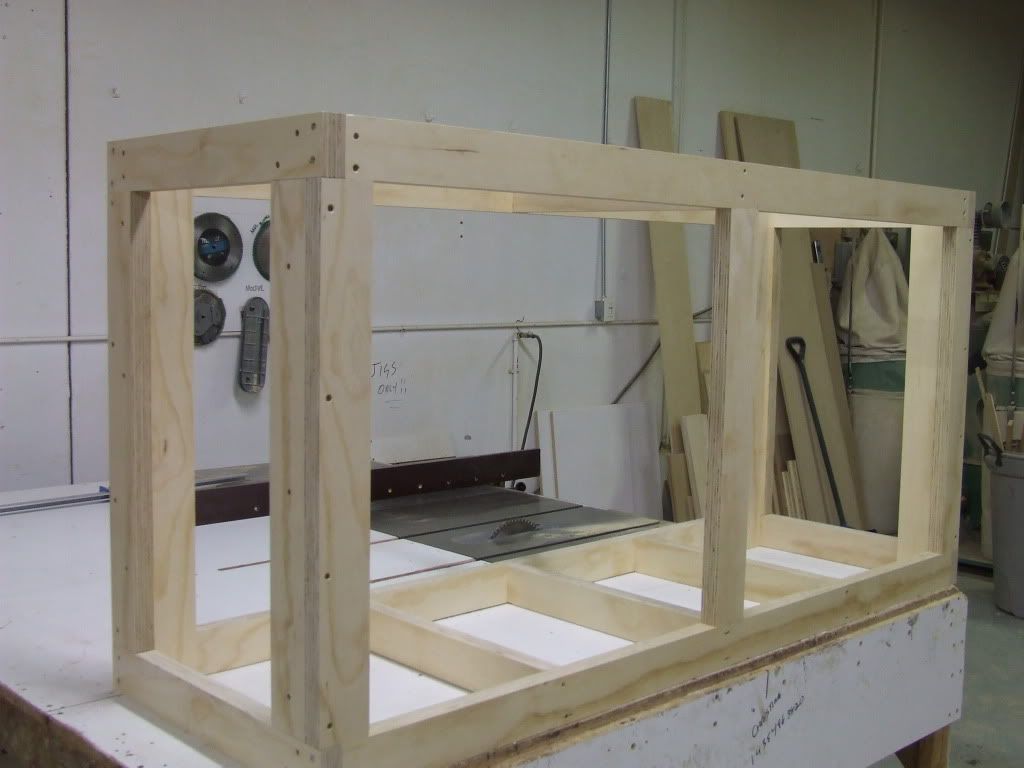
I finished constructing the frame yesterday. Some of the lumber dimensions were inconsistent so I used a hand plane to even them out.
Everything turned out square and it is extremely sturdy but I don't have the tank yet to see if the top frame is flush with the tank.
Edited by GentlemanBean - June 04 2011 at 10:10am
|
|
|
|
Dion Richins
Presidency


Joined: April 03 2005
Location: Farmington
Status: Offline
Points: 11664
|
Post Options
Thanks(0)
Quote Reply
Posted: June 04 2011 at 10:46am |
Looks nice. Very similar to what we build for the inside of larger stands.
|
|
|
|
Lewy
Guest
Joined: April 13 2010
Location: Bountiful
Status: Offline
Points: 995
|
Post Options
Thanks(0)
Quote Reply
Posted: June 04 2011 at 12:05pm |
|
Dion, yours looks more like ply wood than a 2x4 stud. what kind of wood is that?
|
|
40 gal w/ 20 sump
|
|
Trevor40
Guest
Joined: April 28 2011
Location: Woods Cross
Status: Offline
Points: 1653
|
Post Options
Thanks(0)
Quote Reply
Posted: June 04 2011 at 12:12pm |
|
Great build, I'm following along.
|
|
Call or Text (801)834-3119
|
|
Dion Richins
Presidency
Joined: April 03 2005
Location: Farmington
Status: Offline
Points: 11664
|
Post Options
Thanks(0)
Quote Reply
Posted: June 04 2011 at 1:55pm |
|
Its 1.5" engineered lumber.I used to use 2x4's but had the same issue of not being consistent.
|
|
|
|
Lewy
Guest
Joined: April 13 2010
Location: Bountiful
Status: Offline
Points: 995
|
Post Options
Thanks(0)
Quote Reply
Posted: June 04 2011 at 5:31pm |
|
I love the open design. No vertal brace in the middle so you can get in to the sump.
|
|
40 gal w/ 20 sump
|
|
GentlemanBean
Guest
Joined: April 19 2008
Location: Murray
Status: Offline
Points: 592
|
Post Options
Thanks(0)
Quote Reply
Posted: June 14 2011 at 11:01pm |
My tank arrived at The Aquarium. Here is the the obligatory photo of my child in the tank:
The tank came with black trim and a huge center brace. I decided to remove these and replace them with a eurobrace:
I still have some cleanup to do to get rid of the last of the silicone and I still need to get the glass for the brace. Tyler recommended Kelly Stained Glass in Odgen. If anyone else has a glass supplier recommendation, please let me know.
Edited by GentlemanBean - June 14 2011 at 11:02pm
|
|
|
|
bstuver
Guest

Joined: April 17 2006
Location: Provo
Status: Offline
Points: 9379
|
Post Options
Thanks(0)
Quote Reply
Posted: June 14 2011 at 11:12pm |
Your dog cracks me up! Nice looking build however I look at a tank that big without a brace on the bottom and just cringe 
|
|
Jackie Stuver
"wait these aren't the happy Hawaiians oompa doompa godly heaven on your face zoas? I dont want them then. lol!" Ksmart
|
|
GentlemanBean
Guest
Joined: April 19 2008
Location: Murray
Status: Offline
Points: 592
|
Post Options
Thanks(0)
Quote Reply
Posted: June 14 2011 at 11:23pm |
bstuver wrote:
Your dog cracks me up! Nice looking build however I look at a tank that big without a brace on the bottom and just cringe |
lol. didn't mean to scare you. i didn't remove the brace from the bottom. only the one on the top. the bottom brace will be covered by the stand trim
|
|
|
|
bstuver
Guest
Joined: April 17 2006
Location: Provo
Status: Offline
Points: 9379
|
Post Options
Thanks(0)
Quote Reply
Posted: June 14 2011 at 11:41pm |
|
Whew ok good!! I was worried:)
|
|
Jackie Stuver
"wait these aren't the happy Hawaiians oompa doompa godly heaven on your face zoas? I dont want them then. lol!" Ksmart
|
|
GentlemanBean
Guest
Joined: April 19 2008
Location: Murray
Status: Offline
Points: 592
|
Post Options
Thanks(0)
Quote Reply
Posted: June 22 2011 at 6:14pm |
Here is post including all of the recent tank developments.
After hours and hours of scrubbing with steel wool, I got all of the leftover silicone off. Then I ordered my glass from Kelly Stained Glass. I went with 3" wide 1/2" thick starphire glass and RTV 108 silicone from Momentive.
After a couple of failed attempts to get a solid and professional looking silicone seam, I finally got it down. Here is the first piece which is currently curing:
Once that one is cured I'll do the other long side followed by the two short sides.
I aslo received my bulkheads from BRS but decided that 1.5" was way to big and I'm returning them for 1" schedule 80 bulkheads.
Finally, I got a hammerhead from Dion for a smoking deal. I took it apart to clean it and noticed the seals were looking near the end of their life. After looking online and only finding them for $60 plus shipping, I tried contacting reeflo directly and they sent me a new set for $30 shipped!
|
|
|
|