| Author |
 Topic Search Topic Search  Topic Options Topic Options
|
jwoo 
Presidency

Joined: April 29 2009
Location: Alpine
Status: Offline
Points: 3603
|
 Post Options Post Options
") Thanks(0) Thanks(0)
 Quote Quote  Reply Reply
 Topic: A different type of tank build Topic: A different type of tank build
Posted: January 15 2015 at 5:14pm |
I recently got a 18x18x24 terrarium. I have started my PDF build on it and thought you guys might like to follow along. Here is where are are so far: False bottom. I put in 7 support PVC doodads for the false bottom. The false bottom is an area that water can drain down into keeping the substrate moist but not soaked and helping maintain humidity.I made mine out of egg crate in a manner that is actually pretty similar to a plenum in the salt world. It's a bit of a pain in the butt to cut but its so cheap. I think I over engineered it a bit after reading some horror stories about false bottoms that collapsed I didn't want to risk that. Each pipe has four holes drilled into the bottom for water to move through them. I also drilled holes in the top and zip tied the supports to the egg crate so that they wouldn't slip while I moved the tank around. I was going to glue them to the bottom but this was surprisingly easier and less messy. There is a pond in the bottom right and the water fall tower hole in the back.  I've also got the back and sides siliconed for the Great Stuff expandable foam. You do this so that the foam has something to stick onto when you spray it. The foam is sprayed to create a 3D background that you can carve when dry. This was more of a pain in the butt then I thought it would be. Silicone does not spread easily like paint! You can also see I have the barrier on the false bottom and the waterfall tower is placed in position. The barrier keeps substrate out of the false bottom making sure it stays put. The tower will act as housing for the waterfall pump as well as for a small fan I'll put in for air circulation. It goes all the way to the top so that I can change the pump or fan if I need to later on. I put barrier block on the bottom of the tower to stop messy floaties from getting to the pump and clogging it. At the top 1/3 of the tower you can see another barrier wrapped around - this is for the fan. I'm going to leave a space that is open to that mesh for the fan to blow out of.  View from the top down:  Things to do: 1. Tweak the transition between the pond and the bottom. Need to figure out how to keep the substrate out either via great stuff or egg crate. 2. Spray the great stuff on the back 3. Cover the GS with coco fiber and silicone. 4. Modify top to be a glass top to keep the humidity in. 5. Plant. 6. Frogs.
|
|
None at the moment
Soon: 72 Gallon Bowfront
|
 |
Adam Blundell
Presidency

Joined: June 24 2002
Location: Davis County
Status: Offline
Points: 18526
|
Post Options
Thanks(0)
Quote Reply
Posted: January 15 2015 at 5:20pm |
Way cool! I'm building a new 120 terrarium in February.
Adam
|
|
Come to a meeting, they’re fun!
|
|
jwoo
Presidency
Joined: April 29 2009
Location: Alpine
Status: Offline
Points: 3603
|
Post Options
Thanks(0)
Quote Reply
Posted: January 15 2015 at 5:22pm |
|
Nice Adam! What are you putting in it?
|
|
None at the moment
Soon: 72 Gallon Bowfront
|
|
Adam Blundell
Presidency
Joined: June 24 2002
Location: Davis County
Status: Offline
Points: 18526
|
Post Options
Thanks(0)
Quote Reply
Posted: January 15 2015 at 6:25pm |
My chameleon. I'm replacing my 180 tall cabinet terrarium, going with a 120 glass.
Adam
|
|
Come to a meeting, they’re fun!
|
|
Adam Blundell
Presidency
Joined: June 24 2002
Location: Davis County
Status: Offline
Points: 18526
|
Post Options
Thanks(0)
Quote Reply
Posted: January 15 2015 at 6:32pm |
|
|
|
Come to a meeting, they’re fun!
|
|
jwoo
Presidency
Joined: April 29 2009
Location: Alpine
Status: Offline
Points: 3603
|
Post Options
Thanks(0)
Quote Reply
Posted: January 15 2015 at 7:42pm |
Why the switch? That cabinet is sick! When can I come pick it up? 
|
|
None at the moment
Soon: 72 Gallon Bowfront
|
|
jwoo
Presidency
Joined: April 29 2009
Location: Alpine
Status: Offline
Points: 3603
|
Post Options
Thanks(0)
Quote Reply
Posted: January 25 2015 at 2:18pm |
Update time! UPDATES: Did some more work on it this week. I'm doing my masters degree and some certification courses at the same time so time tends to be limited these days. Trying to work on it at least an hour or two a night. My wife has been helping a ton as well. So I decided to start with the foam. Before I could do that I need to make sure I could keep my "floating" piece of wood a float before I used the GS. Here is what it looked like:  Masking tape was my friend. I really like the Malaysian drift wood piece that is in the corner. And the floating branch is pretty awesome. I plan to make some vines that go from that branch to the water fall/fan column. Here is another pic with some pots in place as well:  I had an interesting challenge with the floating branch. I would have preferred to place the tank on it's back and spray the foam that way. However with the branch I couldn't figure out a good way to do it and keep it where I wanted. So we decided to spray with it upright. This actually had the unintended effect of making some pretty cool looking places in the wall. Here is the first pass with the GS:  You can see that the waterfall/river is the mess of GS that is on the left hand side. I also used GS to foam in part of the pond and to create a barrier for the substrate to prevent it sliding into the pond. Next we carved:  I carved the back and the water feature. There is a cave you can kinda see in the back as well. It's hard to also see but there are several shelves on the background for frogs to do well frog things on. The falls/river:  You can see a straw going through the GS that's actually where the water will come out then the water splits around a "rock" in the middle of the stream. Next we will paint the falls and river in drylock to give a rocky look and then cocofiber/silicone the background. Not sure how far I'll get this week as we're leaving on Saturday to spend 10 days in Disneyworld. When we get back I'd like to get it fully operational and at least plants in as soon as I can.
|
|
None at the moment
Soon: 72 Gallon Bowfront
|
|
Mike Savage
Guest


Joined: July 15 2005
Location: Murray
Status: Offline
Points: 19173
|
Post Options
Thanks(0)
Quote Reply
Posted: January 25 2015 at 2:52pm |
|
Oh, man. That is looking good!
|
|
|
|
jwoo
Presidency
Joined: April 29 2009
Location: Alpine
Status: Offline
Points: 3603
|
Post Options
Thanks(0)
Quote Reply
Posted: January 25 2015 at 3:51pm |
|
Thanks Mike! It's been a pretty fun learning experience so far.
|
|
None at the moment
Soon: 72 Gallon Bowfront
|
|
relethg
Guest

Joined: November 26 2014
Location: Farmington
Status: Offline
Points: 505
|
Post Options
Thanks(0)
Quote Reply
Posted: January 25 2015 at 3:58pm |
Little late now, but I use side cutters (dikes) to cut egg crate and it goes fast. Nice build!
Edited by relethg - January 25 2015 at 3:58pm
|
|
210 G Filled 18 Mar 15
120 G Filled 11 Jun 16
|
|
jwoo
Presidency
Joined: April 29 2009
Location: Alpine
Status: Offline
Points: 3603
|
Post Options
Thanks(0)
Quote Reply
Posted: January 25 2015 at 4:08pm |
|
I had used some tin snips and it went pretty fast. Had to dodge some flying plastic bits at times!
|
|
None at the moment
Soon: 72 Gallon Bowfront
|
|
Mike Savage
Guest
Joined: July 15 2005
Location: Murray
Status: Offline
Points: 19173
|
Post Options
Thanks(0)
Quote Reply
Posted: January 25 2015 at 4:43pm |
 jwoo wrote: jwoo wrote:
. . . Had to dodge some flying plastic bits at times! |
All part of the fun!
|
|
|
|
Shane H
Presidency

Joined: March 09 2003
Location: Brigham City
Status: Offline
Points: 7921
|
Post Options
Thanks(0)
Quote Reply
Posted: January 25 2015 at 6:49pm |
|
Very cool. Enjoy Florida.
|
|
jwoo
Presidency
Joined: April 29 2009
Location: Alpine
Status: Offline
Points: 3603
|
Post Options
Thanks(0)
Quote Reply
Posted: March 22 2015 at 2:02pm |
Well a lot has happened since I last posted. I graduated college (at 32 . . . the 14 year plan works again!) took a vacation to DisneyWorld. Started grad school and just in the last week found time to actually work on this vivarium. But once I started working on it again I really wanted to get it done. Here is what's happened: Finally got the back set with coco fiber. That was . . . messy but not as hard as I had been led to believe it would be. Had my wife help me so we tagged teamed it with one of us applying silicone and the other applying fiber.  After that I got really impatient and wanted it looking finished. So next I made a vine (no pics of making it but I do have a completed pic) which was pretty easy to do actually and it looks awesome. I added my ABG (substrate), Spag moss, leaf litter, sheet moss, painted the outside to cover the false bottom. Here is what it looks like as of today: NOTE: I put some temp bulbs in the light fixture. These are not the bulbs I will be keeping. I ordered two jungle dawns so hopefully they get here soon. Front shot, you can see my vine going from the floating branch to the rock ledge on the right: 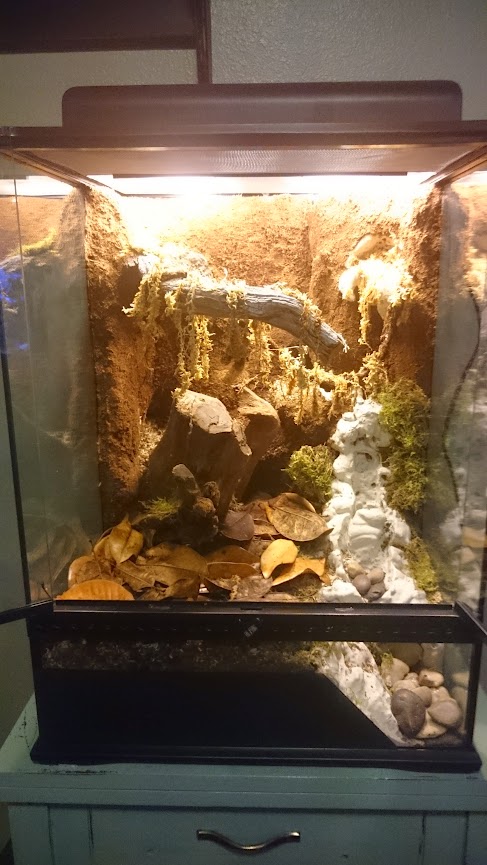 Right side, better view of the vine. You can also see that I used the sheet moss around the waterfall/pond:  And finally the left side:  Things to still do Order plants/springtails Install my internal circulating fan in the tower Plumb the water fall. Install mosquito netting in the lid and front vent. I have this on order should be here Tue. This is so that fruit flies can't escape the viv. Get glass for the top so that I can seal it up and keep the humidity in. Get frogs!
Edited by jwoo - March 22 2015 at 2:39pm
|
|
None at the moment
Soon: 72 Gallon Bowfront
|
|
Mike Savage
Guest
Joined: July 15 2005
Location: Murray
Status: Offline
Points: 19173
|
Post Options
Thanks(0)
Quote Reply
Posted: March 22 2015 at 2:36pm |
|
That is cool!
|
|
|
|
LaRue
Guest
Joined: June 18 2013
Location: Roy
Status: Offline
Points: 907
|
Post Options
Thanks(0)
Quote Reply
Posted: March 23 2015 at 6:04am |
|
That looks awesome.
|
|
jwoo
Presidency
Joined: April 29 2009
Location: Alpine
Status: Offline
Points: 3603
|
Post Options
Thanks(0)
Quote Reply
Posted: April 12 2015 at 3:59pm |
Viv update! Got all my plants in over the past two weeks, got the waterfall working, got the glass top installed, and got my froglets! They are a trio of fine spot leucomelas that are two weeks out of the water. Here are some pictures: One of the three fine spots: 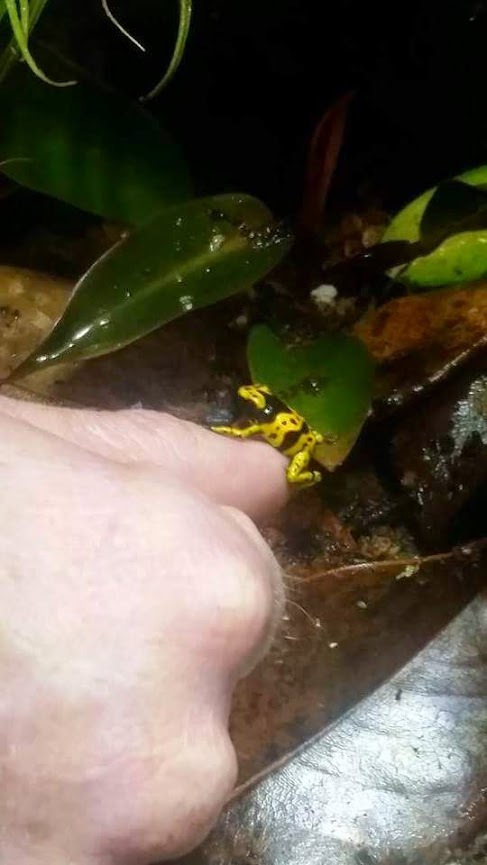 A different one in the viv right after I placed it:  And the last one who did not want to come out of the cup and then wouldn't let go of my hand:  Close up of two:  Some pictures of the plants:   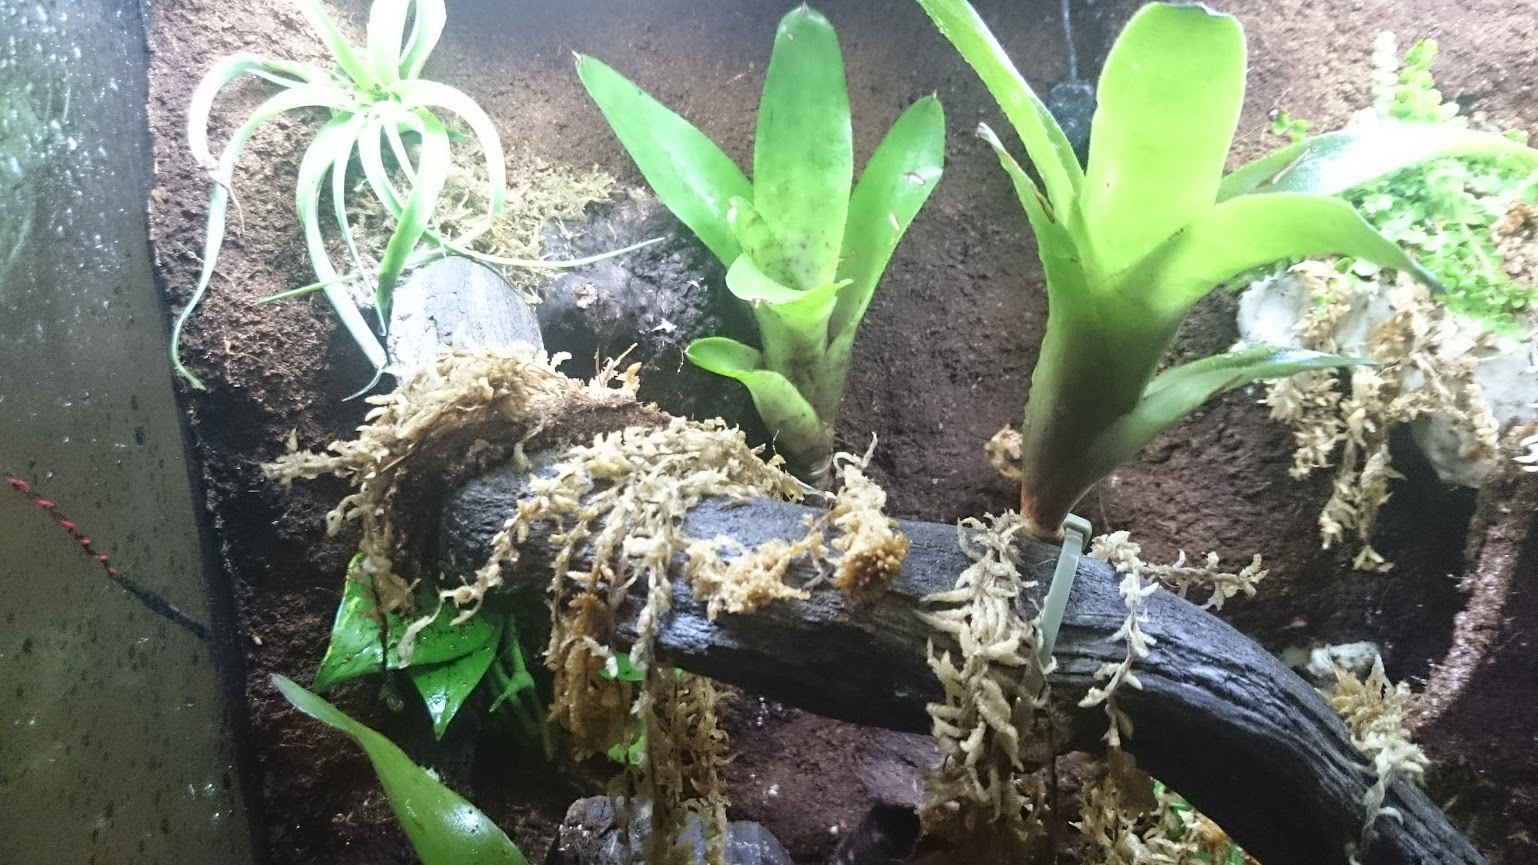 Full Viv Shot: 
|
|
None at the moment
Soon: 72 Gallon Bowfront
|
|
ctreeftank
Guest
Joined: November 10 2013
Location: orem
Status: Offline
Points: 476
|
Post Options
Thanks(0)
Quote Reply
Posted: April 12 2015 at 5:08pm |
|
I would remove the African violet from the tank? African violets do not like having their leaves get wet. When the leaves get to wet they start to die and you will get mold in the tank.
|
|
jwoo
Presidency
Joined: April 29 2009
Location: Alpine
Status: Offline
Points: 3603
|
Post Options
Thanks(0)
Quote Reply
Posted: April 12 2015 at 5:11pm |
|
I actually have a fan that goes off once per hour for five minutes to dry the plants. The violet sits right under it so it should be fine.
|
|
None at the moment
Soon: 72 Gallon Bowfront
|
|
ctreeftank
Guest
Joined: November 10 2013
Location: orem
Status: Offline
Points: 476
|
Post Options
Thanks(0)
Quote Reply
Posted: April 12 2015 at 5:14pm |
|
Just giving my advice.
|
|


