New 75 project
Printed From: Utah Reefs
Category: Main
Forum Name: Tank Threads
Forum Description: A place to show off your tank build.
URL: http://www.utahreefs.com/forum/forum_posts.asp?TID=40238
Printed Date: April 27 2024 at 9:12pm
Software Version: Web Wiz Forums 12.03 - http://www.webwizforums.com
Topic: New 75 project
Posted By: Corey Price
Subject: New 75 project
Date Posted: April 13 2010 at 9:29pm
|
I have started my new 75, and I just want have a place to show what I'm doing. It's not a thread to brag or show off in, but it's more to show my progress, for good or bad. (I still have the Lee-mar for sale as of 4/13/10 but I hope to sell it soon.) The tank is 48x20x20, custom made with a custom stand. I intend to build almost everything myself, including the tank. Here's the new tank, without silicone:  Can you tell which side isn't starphire? Flat polished edges:  Stand concept:  |
Replies:
Posted By: fishoutawater
Date Posted: April 13 2010 at 9:52pm
|
Have you thought about putting the overflow on the outside of the tank? Great start, I love watching builds. ------------- Some day, when I grow up,... |
Posted By: Corey Price
Date Posted: April 13 2010 at 9:57pm
I have thought about placing the overflow on the outside, but I'm space limited where this tank will go, so I want to place it as close to the wall as possible. Placing the overflows on the outside on a rimless tank is possible, but not something practical for this tank. If you notch the back glass on a tank like this, you have to be very carefull that you don't inadvertently introduce a weak area, and this takes some special precautions (in my opinion). |
 fishoutawater wrote:
Posted By: Aquarium Creations
Date Posted: April 13 2010 at 9:57pm
|
The only problem i would see with the overflow on the outside it the distance away from the wall, IMO i don't think it looks that great with a big gap behind the aquarium
------------- Aquarium Maintenance,Consulting,Custom Built Glass Aquariums Rimless/Euro,24Hr Emergency Service 8015485201 Www.UtahAquariumDoctors.com [email protected] |
Posted By: Corey Price
Date Posted: April 13 2010 at 9:59pm
In this case, I totally agree. |
Posted By: tcfab
Date Posted: April 13 2010 at 10:13pm
| Corey, what sillicone are you using? How thick is the glass? Its looking good. |
Posted By: Corey Price
Date Posted: April 13 2010 at 10:15pm
|
Stand: Maple with a black glaze, custom-built. I think the stand will be harder than it looks. Sump: To be determined. Possibly this will be the one exception to my DIY madness in that I'll probably just get a standard glass tank that fits the stand. If I get the urge, I'll build one out of acrylic. I want a sump with a nice refugium, a good-sized skimmer, and a good sand bed. Return Pump:  It adds heat, but is dead silent and I've had it for a while. I seriously can't hear the pump run. If it contributes to the tank heat too much, I'll swap it out. Overflow: I'm going with the valved drain with an overflow, secondary drain (the "Herbie" method). Again, dead silent and reduces the need for baffles in the sump, etc. due to the lack of air in the drain. Water Motion: Vortech MP40w, probably on the side. I have this already. If it's too ugly, I might even try two Tunze Stream powerheads. |
Posted By: Corey Price
Date Posted: April 13 2010 at 10:21pm
I can't tell you which silicone I'm using, sorry. All I can say is that I've had help in choosing it. The glass is 1/2" thick. I am not going very tall, and after doing the calcs, 1/2" seems fine. Thicker glass is beneficial for the joints only, given the height I have. I would have loved to do thicker glass (I see your tank has 3/4" thick glass), but costs and availability of the 3/4" starphire glass pushed my decision to 1/2" glass. I got a deal on the 1/2" starphire glass that I couldn't pass up. |
Posted By: tcfab
Date Posted: April 13 2010 at 10:28pm
| 1/2" on a 20" tall tank will be fine. Are you doing a bottom eurobrace? |
Posted By: Corey Price
Date Posted: April 13 2010 at 10:36pm
No, I'm probably not going to do a bottom euro-brace. Seriously, the side joints worry me more than the bottom. I didn't know which silicone to use originally, but I found a couple good ones. It isn't hard to find, really. |

Posted By: fishoutawater
Date Posted: April 13 2010 at 10:48pm
|
Love those pumps, I have to touch it to make sure it is running because you can not hear it. I have two on my 40 with sump and temps still stay under 79 with only 3 computer fans for cooling. ------------- Some day, when I grow up,... |
Posted By: Corey Price
Date Posted: April 13 2010 at 10:56pm
If only they didn't heat up the water so much, I'd use the Velocity/Blueline/Poseidon titanium T4 pump every time. I will try it this time. |
Posted By: Aquarium Creations
Date Posted: April 13 2010 at 10:56pm
|
poseidon pumps are great for smaller aquariums
------------- Aquarium Maintenance,Consulting,Custom Built Glass Aquariums Rimless/Euro,24Hr Emergency Service 8015485201 Www.UtahAquariumDoctors.com [email protected] |
Posted By: Corey Price
Date Posted: April 13 2010 at 11:04pm
|
Lighting: I'm leaning toward all T5's, but this could change. We'll see. I gotta build a tank first. |
Posted By: laynframe
Date Posted: April 16 2010 at 9:29pm
|
I would recommend a eurobrace on the bottom it doubles up your glue joint surface area and the bottom of the tank has the most pressure. If you look at the high end tank manufacturers you'll find the bracing on the bottom, it's cheap insurance! I dont know what silicone your using but I recommend momentive rtv 100 series, it's a addhesive silicone. I have used it several times with zero failures. And if it is good enough for LeeMar it's good enough for me ;). Just my two cents. Looks good! ------------- The time we enjoy wasting isn't wasted time!!!! |
Posted By: Corey Price
Date Posted: April 16 2010 at 10:11pm
The hydrostatic force at the bottom of a 24" tall tank (with top eurobracing) that the silicone has to resist is about 80 pounds per linear foot, or about 13 psi on a 1/2" joint. My Lee-mar tank is like this. The hydrostatic force at the bottom of a 20" tall rimless tank is about 70 lbs per linear foot, or about 12 psi for a 1/2" joint. There are significant flexural forces in a rimless that in which the ratio of the length to height is greater than 2, which includes my tank, and I'm not including this. I think eurobracing is fine, but probably overkill, though. I look at it as a belt & suspenders approach, which isn't bad. I'll look into it. I am trying a certain kind of silicone, but here are some examples of the recommended silicones out there for aquariums: Dow Corning 732 GE (Momentive) RTV 108 Perennator AQ 201 (the packaging, although in german, seems awfully close to the Aqueon stuff) Aqueon aquarium silicone GE silicone I There are UV-set glues out there as well that will bond glass to PVC, etc. but these are expensive and require a UV light to cure. |
Posted By: Corey Price
Date Posted: April 22 2010 at 10:45pm
Here's the stand:  The TANK BUILDING stand, that is. I'm going to put the tank together on this. With a few tricks, I have this 4'x8' table really, really flat. Really flat. |
Posted By: Corey Price
Date Posted: April 22 2010 at 10:50pm
|
I have the silicone, tape, alcohol, etc. I hope to get going Saturday. I bought extra silicone so that when I screw up and redo the tank, it's no problem. Murphy says that I'll get it right the second or third time around. |
Posted By: thefu
Date Posted: April 23 2010 at 5:29pm
| How about http://www.otto-chemie.de/contrance/upload/tds-s28-gb.pdf - Ottoseal S28 ? Is that any good for something like this? |
Posted By: tcfab
Date Posted: April 23 2010 at 7:25pm
Lets see some silicone going on already
|
Posted By: Corey Price
Date Posted: April 23 2010 at 7:34pm
| Patience, young grasshopper! These things take time to plan out and set up. |
Posted By: tcfab
Date Posted: April 23 2010 at 7:38pm
|
LOL, yes they do
|
Posted By: tcfab
Date Posted: May 04 2010 at 8:17am
| Hows the tank coming along Corey? any updates? |
Posted By: Corey Price
Date Posted: May 04 2010 at 9:25pm
|
I'll post progress pictures tomorrow. |
Posted By: CapnMorgan
Date Posted: May 04 2010 at 9:28pm
|
Can't wait! ------------- Steve http://utahreefs.com/forum/forum_posts.asp?TID=40637&PID=356246" rel="nofollow - My Old 180G Mixed Reef Currently: 120G Wavefront Mixed 29G Seahorse & Softies Running ReefAngel Plus x2 435-8 |
Posted By: Corey Price
Date Posted: May 05 2010 at 11:41pm
Adam Blundell came to help me tonight. We assembled the whole thing in less than 30 minutes. The edges are near perfectly aligned (only one is out by less than a 64th of an inch) and the gaps & silicone job is acceptable, but not absolutely perfect (it is my first try). I used just over one tube of silicone.  I still need to remove some goobers & stuff with a razor, but it's close. Adam & Mark Peterson thought it looked great, but I'm a perfectionist... Corey |
Posted By: Nick801
Date Posted: May 06 2010 at 12:03am
|
Yeah that's sweet where did you get those cool corner clamps?
------------- http://www.reefinsanity.com" rel="nofollow - www.ReefInsanity.com http://www.facebook.com/ReefInsanity" rel="nofollow - www.Facebook.com/ReefInsanity 801-680-4676 |
Posted By: Corey Price
Date Posted: May 06 2010 at 12:09am
| Home Cheapo sells the clamps for aboutr $9 each. Cheap, and you can't have too many tools. |
Posted By: Adam Blundell
Date Posted: May 06 2010 at 10:39am
|
Corey is talking crazy. That thing looks amazing. The joints are better looking than my tank... and my tanks was professionally built. It's flippin sweet.
Adam ------------- Come to a meeting, they�re fun! |
Posted By: Corey Price
Date Posted: May 06 2010 at 12:51pm
|
The joints could have been better- there are some microbubbles in some areas. I have no idea why there are really teeny bubbles (but you can see them with a flashlight) in some areas of the joints. They are more cosmetic in nature than anything IMHO. I may have touched the surface and got some skin oil on the glass or something. |
Posted By: Jake Pehrson
Date Posted: May 06 2010 at 1:43pm
|
Looks good. ------------- Jake Pehrson Murray http://coralplanet.com" rel="nofollow - coralplanet.com http://utahbeeranch.com" rel="nofollow - :) |
Posted By: tcfab
Date Posted: May 06 2010 at 1:58pm
| Looking good Corey. I have heard sometimes those really small bubbles will go away as the silicone cures. |
Posted By: Aquarium Creations
Date Posted: May 06 2010 at 3:53pm
|
Typically, More bubbles will show up as the silicone shrinks while it is curing. I doughty its anything to worry about, You have seen how horrible of a job Leemar did
------------- Aquarium Maintenance,Consulting,Custom Built Glass Aquariums Rimless/Euro,24Hr Emergency Service 8015485201 Www.UtahAquariumDoctors.com [email protected] |
Posted By: Corey Price
Date Posted: May 06 2010 at 6:24pm
Mark and I were looking at my Lee-Mar in the basement, and it's joints look nearly perfect, with similar flaws to mine. It doesn't have the microbubbles I have, but it does have a few more major bubbles than mine does. I'll try to post a picture if I can get a macro lens or something good enough to show the joints. |
Posted By: Corey Price
Date Posted: May 06 2010 at 10:37pm
|
No luck on the macro. My DSLR doesn't have a macro lens. I cleaned up the edges and wow, it looks great! However, one of the back to side seams is not great, I noticed today. I'm tempted to tear it down and do it over. I've been thinking about it all day, but I'm tempted to also just let it be (it looks dang strong, but there's a couple long linear bubbles down the inside seam). All cleaned up: 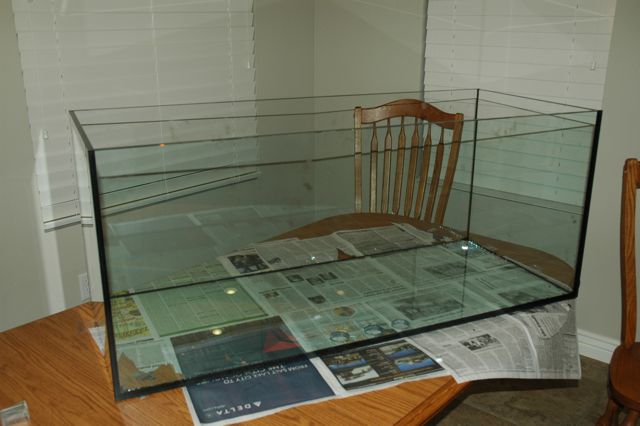 I'm having fun now: 
|
Posted By: Corey Price
Date Posted: May 06 2010 at 10:47pm
|
The tank was why I didn't go to the meeting tonight. I was so excited to clean it up that I just skipped dinner. Decisions, decisions... If I tear it down, I'm not sure I'll get it put back together this good. The bottom doesn't have flat polished edges, and it will be a PITA to clean off the silicone, not to mention the possibility of breaking a panel in the process of dismantling it. I'm tempted to fill it, and if the back side seam has a leak, I'll run a new reinforcing bead of silicone down it, and do the same to the other side for consistency. Who knows, it could leak somewhere else. Thoughts? I'm on to the stand if this is it, and I think it might be. I'm totally pumped about it. |
Posted By: Aquarium Creations
Date Posted: May 06 2010 at 11:08pm
|
I would leave it, If it leaks ( which i doubt )then i would tear apart and redo.
------------- Aquarium Maintenance,Consulting,Custom Built Glass Aquariums Rimless/Euro,24Hr Emergency Service 8015485201 Www.UtahAquariumDoctors.com [email protected] |
Posted By: Corey Price
Date Posted: May 06 2010 at 11:22pm
I think the joint in question might have skinned over before we got it together. None of the other joints look like it. |
Posted By: Adam Blundell
Date Posted: May 07 2010 at 9:47am
|
For heaven's sake Corey you must be the most anal retentive or annoying hobbyist I've ever met. LOL That tank is awesome, quit bitchin and just fill it up. Nobody is going to look at those seems anyway. All this worry for nothing. It looks awesome and everyone here would be thrilled to have that tank. Adam ------------- Come to a meeting, they�re fun! |
Posted By: Luckedout
Date Posted: May 07 2010 at 10:26am
Quote of the month right there! Get it wet! Let's see some water in that! ------------- -Ben 90g Mixed reef www.body-balancechiropractic.com |
Posted By: Corey Price
Date Posted: May 07 2010 at 11:04am

|
Posted By: Shane H
Date Posted: May 07 2010 at 9:13pm
|
Corey - the tank looks great! Well done.
BTW - I'm guessing that being a perfectionist is a very desireable trait for a structural engineer!
|
Posted By: Deluxe247
Date Posted: May 10 2010 at 1:51pm
|
I'm with Adam. Fill that baby up and let's see that stand come to life (it looked nice in the sketch - not overdone). ------------- 90G Mixed Reef |
Posted By: Corey Price
Date Posted: May 12 2010 at 9:14pm
| It holds water, and it doesn't leak. I wish the seams were perfect. I'll post pics tomorrow. |
Posted By: Corey Price
Date Posted: May 13 2010 at 9:15am
Drumroll please... 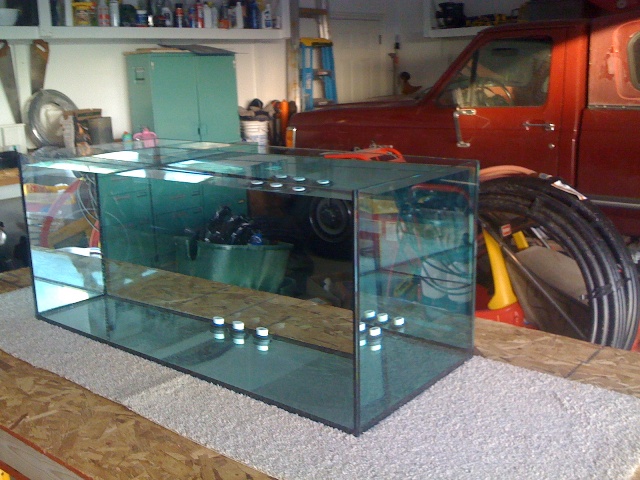
|
Posted By: Ryan Thompson
Date Posted: May 13 2010 at 9:52am
|
Corey, What pump are you using? I would actually really like a pump that transfers a lot of heat to the water. I have an open top T5 system and my heater runs non stop to keep the tank at 76.5 degrees. I need a pump that will only move like 250gph or so.
|
Posted By: Corey Price
Date Posted: May 13 2010 at 1:59pm
|
Ryan, I am using a Poseidon T4. I think there is a high pressure lower flow T3 that might flow less than 600 gph. You need some wattage to add heat, probably more than a 250 gph pump can produce. |
Posted By: Mark Peterson
Date Posted: May 13 2010 at 5:42pm
|
OK Corey, It has water and a light. What are you waiting for? Throw in some coral and fish. We want to see that baby come to life. ------------- Reefkeeping Tips, & quick, easy setup tricks: www.utahreefs.com/forum/forum_posts.asp?TID=9244 Pay it forward - become a paid WMAS member 
|
Posted By: Corey Price
Date Posted: June 07 2010 at 7:51am
|
I bought the rough-sawn maple, some acrylic for the overflows and a new saw to build the stand. I don't have pictures, unless someone wants pictures of scrap acrylic, some 6/4 maple and a table saw. |
Posted By: Corey Price
Date Posted: July 22 2010 at 11:40pm
| I have the tools to build the stand now, so I'll start to post pics shortly. |
Posted By: Corey Price
Date Posted: October 12 2010 at 9:48pm
| Yes, the project is still going. I had to take a break for a few months from everything, and when I came back, this thread was moved and everything changed on the board! Progress coming soon. |
Posted By: Corey Price
Date Posted: November 06 2010 at 10:25am
 Overflow weir is done. I notched the acrylic using the table saw and a jig I came up with. Shane Silcox's laser cutter was my second choice if the table saw jig hadn't worked, but it was fine and I don't have to bug Shane. Notice that the acrylic isn't black, but smoked. At first, I realized I grabbed smoked acrylic from the scrap bin, but I thought I could make this be a feature. I will be valving the drain and using a secondary backup drain, so I think this will be a great way to check levels. I am going to use 1" black PVC, so no problem seeing white PVC through the overflow. If I get a wild hair, I will go and buy some black acrylic, though, and re-do it. I realized that the smoked will still let enough light through to grow stuff in the overflow. Also, the glue job wasn't the best on this one. Corey |
Posted By: Corey Price
Date Posted: November 06 2010 at 6:46pm
|
I won two bags of black sand at the reef fest today, so I'm really tempted to use it... I need to do some research on that stuff for sure. I also won a bag of sugar-fine aragonite sand and a gift certificate to Air, Water, and Ice, which is where I bought my RO unit, so I can buy new stuff for it! |
Posted By: backwards32
Date Posted: November 10 2010 at 10:51am
| I am really impressed. I would love to build my own tank soon. anyway you could teach me some of the tricks of the trade? |
Posted By: Corey Price
Date Posted: November 11 2010 at 10:55pm
| It's all in the silicone joints, and good quality glass cut to exact size. I'm not the best at joints by all means. |
Posted By: Jake Pehrson
Date Posted: November 12 2010 at 12:58am
|
Corey,
I will trade you a bag or two of the black sand for that oolitic you won. ------------- Jake Pehrson Murray http://coralplanet.com" rel="nofollow - coralplanet.com http://utahbeeranch.com" rel="nofollow - :) |