| Author |
 Topic Search Topic Search  Topic Options Topic Options
|
CapnMorgan 
Guest


The Capn'
Joined: August 19 2009
Location: Tooele
Status: Offline
Points: 3537
|
 Post Options Post Options
") Thanks(0) Thanks(0)
 Quote Quote  Reply Reply
 Topic: DIY Tank Build Topic: DIY Tank Build
Posted: January 14 2010 at 7:47pm |
Now that my project is almost done I thought I'd post pics of my new tank. I wanted to build a tank that could serve as two separate environments for fish/corals. So I could adjust flow, lighting, etc specifically for each compartment. I got the acrylic from Delvies Plastics in SLC. I used 3/8" cell cast acrylic just to be safe, even though the math said that 1/4" would be fine for this application. So with an idea in mind I drew up a cut sheet and faxed it over to Delvies.
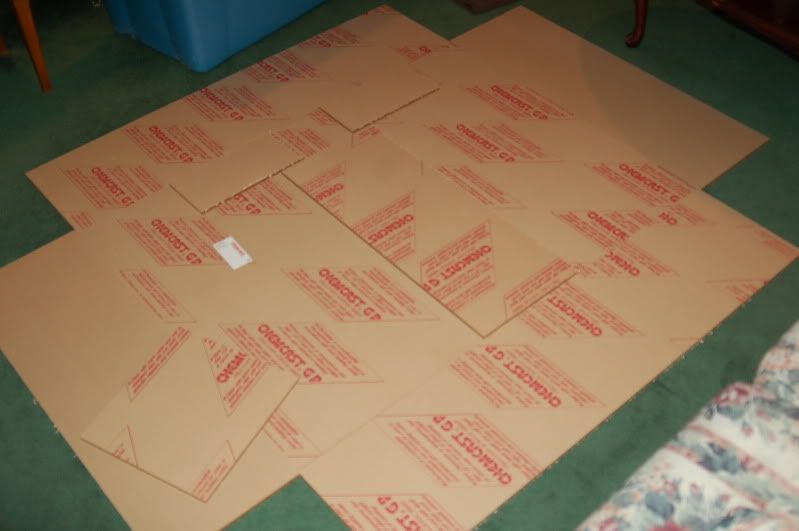
The first thing I did was lay out all the cut pieces and make sure it was all going to fit as planned.
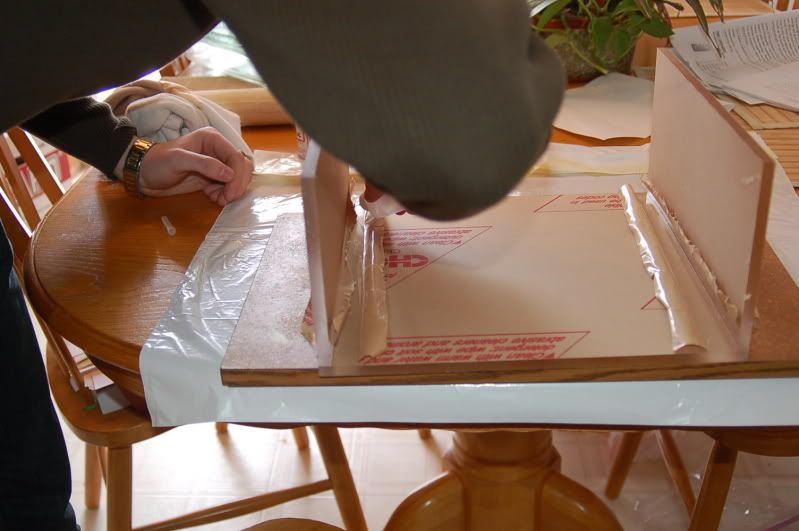
Then I set to work on the overflow. The masking was peeled back just enough so that I could see the edge I would be seaming together clearly, and the edge was prepped with a light sanding with some fine grit sandpaper. It's important to remember to go all the way to the edges and apply even pressure to avoid cupping your acrylic.
Then I started seaming the edges. You want to go slowly and make sure that you get all the air bubbles out of the joint to ensure that it will be strong when fully cured. Otherwise it could be look out Noah. (Wait 4 hours between each seaming before moving the pieces or continuing to build.)
After the overflow box was set I seamed it to the bottom panel, after edge prep and measuring to make sure it was in the middle of the tank.
4 hours later I prepped the edge of the middle panel and seamed it onto the bottom panel. (It's important to note that you can only seam a horizontal joint. So when you're building plan out how to arrange the tank to seam each joint to prevent the solvent from running.)
After sitting overnight I seamed the front panel to the middle divider and bottom panel. I also seamed the joint between the divider and overflow box.
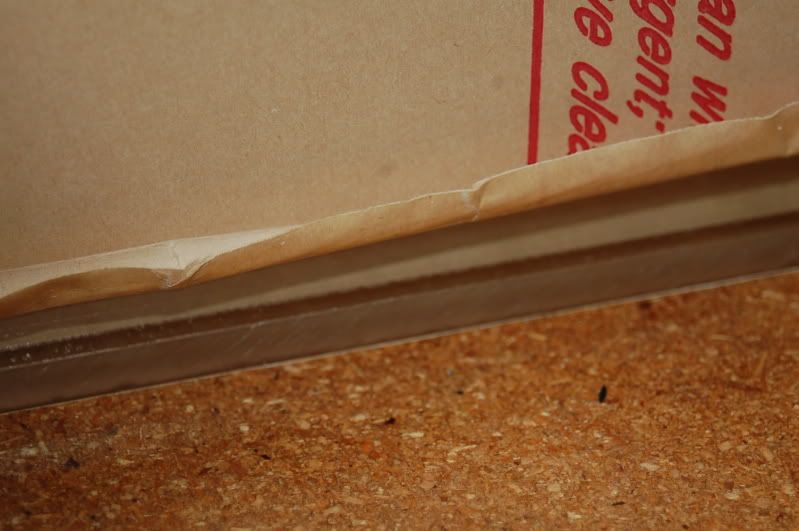
Here is what your joint should look like:
Then I cut the holes for overflow plumbing. I used an ordinary hole-saw. While drilling you'll need someone to spray the bit and cut being made with cold water to prevent the acrylic from melting. You may have to stop a couple times to get all the way through. Another tip is to never drill all the way through from one side. Always go about halfway from each side, this will prevent splintering or chipping that would make a watertight seal difficult.
After finishing the holes the back panel was seamed to the bottom panel and overflow box.
After the 4 hour waiting periods the side panels were seamed onto the tank.
After another 4 hours I laid the tank flat and applied a thicker solvent over the joints to reinforce the joints and provide a better seal.
5 days later the tank was water tested and it passed with flying colors.
Got the plumbing in and fit the tank for the return lines. I just need to finish building the standpipe. If anyone has any ideas for what sort of fittings to use I'm open to suggestions
So after finishing the stand I installed the rest of the plumbing:
After installing the plumbing I mounted the light that will be used for a little while. I also rewired the fixture to allow for turning on one half at a time.
I also started filling it up with water, so by Monday the cycle should be in full swing.
Edges are still looking great, even filled with water:
Here are a few pics of the pump/overflow working, I'll post more pics once I get the sand and rock in. . Here is a photo of the tank with sand in it. I still probably need about 20-30 lbs but I will be adding it over the next few days. Just waiting for the water to clear now. I used about 40 lbs of fiji pink oolitic sand, 40 lbs of a coarser aragonite sand, and about 40 lbs of live oolitic sand
So I thought I'd post a couple more pics, I got a few filter socks to clear the water, and the tank has finished cycling  I also have about 50 more lbs of live rock I will be adding from another tank (most of this will be in the sump).
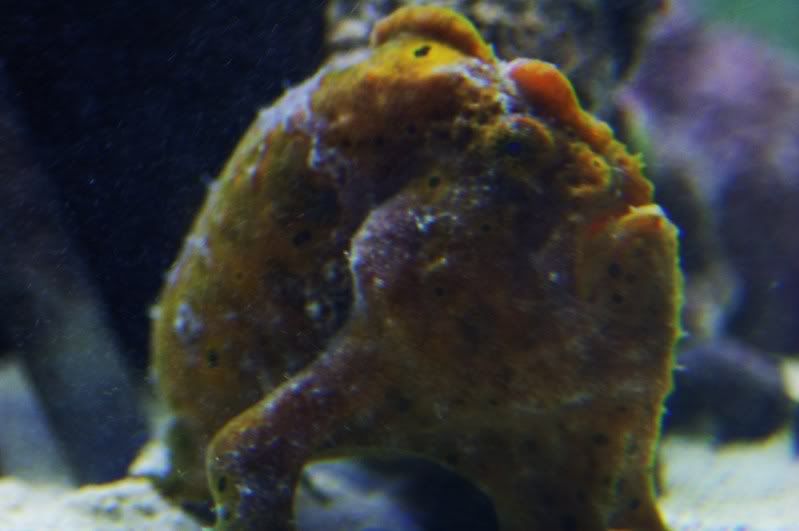
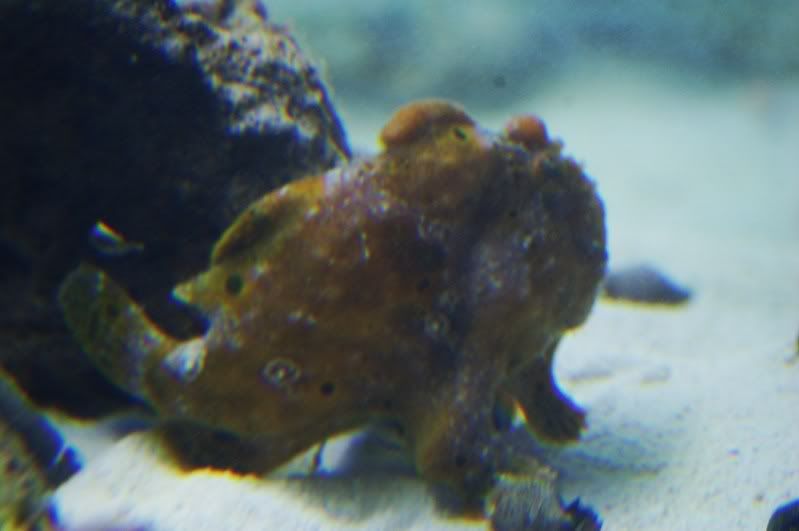
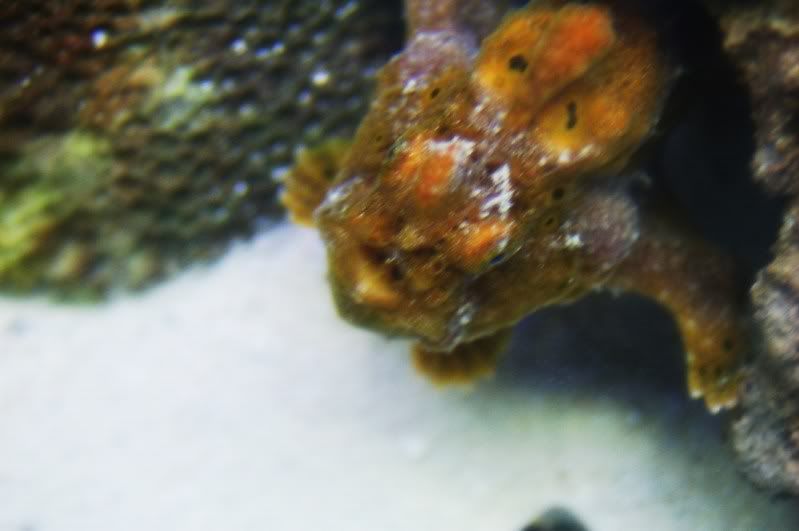
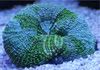
Some pics of the new Frogfish:
Edited by CapnMorgan - January 27 2010 at 4:55pm
|
Steve My Old 180G Mixed ReefCurrently: 120G Wavefront Mixed 29G Seahorse & Softies Running ReefAngel Plus x2 435-8
|
 |
Luckedout
Guest

Joined: October 11 2009
Location: Layton
Status: Offline
Points: 1495
|
Post Options
Thanks(0)
Quote Reply
Posted: January 14 2010 at 8:03pm |
|
Oh wow! Very professional looking. I like it quite a bit! I'll be following your progress closely.
What are the final measurements of the tank? Gallons?
|
|
-Ben
90g Mixed reef
www.body-balancechiropractic.com
|
|
jwoo
Presidency

Joined: April 29 2009
Location: Alpine
Status: Offline
Points: 3603
|
Post Options
Thanks(0)
Quote Reply
Posted: January 14 2010 at 8:20pm |
|
That looks really really good. You are certainly talented!
|
|
None at the moment
Soon: 72 Gallon Bowfront
|
|
CapnMorgan
Guest
The Capn'
Joined: August 19 2009
Location: Tooele
Status: Offline
Points: 3537
|
Post Options
Thanks(0)
Quote Reply
Posted: January 14 2010 at 8:35pm |
Thanks jwoo, I have been practicing on small stuff for a while and finally decided it was time to go all out.
LuckedOut- Tank dimensions are 48"x36"x12" it holds roughly 100 gallons. I'll be routing the slots into the overflow in the next day or so. I also have a 40 gallon sump with Iwaki70 return pump that will be on this system. I'll keep updating pics as I add more to the tank.
|
Steve My Old 180G Mixed ReefCurrently: 120G Wavefront Mixed 29G Seahorse & Softies Running ReefAngel Plus x2 435-8
|
|
jwoo
Presidency
Joined: April 29 2009
Location: Alpine
Status: Offline
Points: 3603
|
Post Options
Thanks(0)
Quote Reply
Posted: January 14 2010 at 8:49pm |
|
I was serious. I am a butterfingers when it comes to building things. I would love to be able to build something that good looking.
Do mind going into you plans a little more? I am very curious about the idea of two tanks in one. Your mention of varying flow between the two sides has peeked my curiosity as to the final plans for live stock etc. I think this could be one extremely interesting tank!
|
|
None at the moment
Soon: 72 Gallon Bowfront
|
|
Dion Richins
Presidency

Joined: April 03 2005
Location: Farmington
Status: Offline
Points: 11664
|
Post Options
Thanks(0)
Quote Reply
Posted: January 14 2010 at 9:00pm |
|
Very sweet. You've done good!!
|
|
|
|
fishoutawater
Guest

Joined: March 23 2009
Location: Herriman
Status: Offline
Points: 639
|
Post Options
Thanks(0)
Quote Reply
Posted: January 14 2010 at 9:10pm |
|
Do all of your seems look as good as the one you showcased? If so, I am impressed! Especially on the long runs. Did you use pins?
|
|
Nick801
Guest
Joined: July 03 2008
Location: Sandy
Status: Offline
Points: 4155
|
Post Options
Thanks(0)
Quote Reply
Posted: January 14 2010 at 9:19pm |
|
looks great
|
|
|
|
CapnMorgan
Guest
The Capn'
Joined: August 19 2009
Location: Tooele
Status: Offline
Points: 3537
|
Post Options
Thanks(0)
Quote Reply
Posted: January 14 2010 at 10:02pm |
jwoo- Sure, to be honest I haven't thought too much about livestock, but I will be running a single 2" drain, but will have two separate return lines which will then be teed off so each side will have 2 return nozzles. I will be installing a ball/gate valve (I haven't decided which) on each return line so I can control how much flow each side receives independently. If you ever decide to take the plunge let me know I'm glads to help!
Fishoutawater- Yes all my seams look this way, I've had a lot of practice building up to this. I don't really like the pin method so I don't use it. I just spend a lot of time prepping the edges I'm going to seam. I've found that's the key to getting good air-free joints. I also have learned not to skimp on the solvent use plenty, and have a rag handy to dab away any excess that might run out of the joint.
Dion and Nick- Thanks!
|
Steve My Old 180G Mixed ReefCurrently: 120G Wavefront Mixed 29G Seahorse & Softies Running ReefAngel Plus x2 435-8
|
|
MadReefer
Guest
Joined: December 13 2007
Location: Kearns
Status: Offline
Points: 1965
|
Post Options
Thanks(0)
Quote Reply
Posted: January 14 2010 at 10:09pm |
It looks great!
What number solvent did you use?
Edited by MadReefer - January 14 2010 at 10:09pm
|
|
CapnMorgan
Guest
The Capn'
Joined: August 19 2009
Location: Tooele
Status: Offline
Points: 3537
|
Post Options
Thanks(0)
Quote Reply
Posted: January 14 2010 at 10:15pm |
|
I used weldon #4, and then added a small bead of weldon #16 to double seal all the seams
Edited by CapnMorgan - January 14 2010 at 10:41pm
|
Steve My Old 180G Mixed ReefCurrently: 120G Wavefront Mixed 29G Seahorse & Softies Running ReefAngel Plus x2 435-8
|
|
Corey Price
Guest

Joined: August 25 2004
Location: Farmington
Status: Offline
Points: 2567
|
Post Options
Thanks(0)
Quote Reply
Posted: January 14 2010 at 10:40pm |
 CapnMorgan wrote: CapnMorgan wrote:
I used weldon #40, and then added a small bead of weldon #16 to double seal all the seams |
Don't you mean Weld-on #4? Weld-on #40 is a two-part thick epoxy-like glue, while #4 is more of a solvent.
|
|
CapnMorgan
Guest
The Capn'
Joined: August 19 2009
Location: Tooele
Status: Offline
Points: 3537
|
Post Options
Thanks(0)
Quote Reply
Posted: January 14 2010 at 10:41pm |
Yup, thanks Cory! I am still getting used the the new laptop's number pad lol.
Also a quick update: I just checked my emails and my bulkheads and lockline should be here tomorrow so I'll post more pics of it with plumbing installed. My goal is to have it cycling by next week at the latest
Edited by CapnMorgan - January 14 2010 at 10:44pm
|
Steve My Old 180G Mixed ReefCurrently: 120G Wavefront Mixed 29G Seahorse & Softies Running ReefAngel Plus x2 435-8
|
|
GUNDLR
Guest

Joined: December 06 2009
Location: SO. J
Status: Offline
Points: 338
|
Post Options
Thanks(0)
Quote Reply
Posted: January 14 2010 at 11:30pm |
|
LOOKIN GOOD HOMEZZZZZZ........... CANT WAIT TO SEE HER FLOWIN SALTY AGUA
|
|
CapnMorgan
Guest
The Capn'
Joined: August 19 2009
Location: Tooele
Status: Offline
Points: 3537
|
Post Options
Thanks(0)
Quote Reply
Posted: January 14 2010 at 11:35pm |
|
Thanks man, me too.
|
Steve My Old 180G Mixed ReefCurrently: 120G Wavefront Mixed 29G Seahorse & Softies Running ReefAngel Plus x2 435-8
|
|
kody72
Guest
Joined: October 05 2009
Location: North Ogden
Status: Offline
Points: 1466
|
Post Options
Thanks(0)
Quote Reply
Posted: January 14 2010 at 11:54pm |
|
looks great gotta see it in person sometime
|
|
bfessler
Guest

Joined: March 13 2009
Location: Lehi
Status: Offline
Points: 1708
|
Post Options
Thanks(0)
Quote Reply
Posted: January 15 2010 at 9:57am |
Great Job Steve,
I really want to do a 3' deep tank for my next display. I'm curious though how are you going to rout the overflow with it already installed? Are you using a laminate trimmer with an offset base?
Edited by bfessler - January 15 2010 at 9:59am
|
Burt
An equal opportunity reefer,
I support all hobbyists and organizations involved in Marine Aquarium Keeping.
[email protected]
|
|
CapnMorgan
Guest
The Capn'
Joined: August 19 2009
Location: Tooele
Status: Offline
Points: 3537
|
Post Options
Thanks(0)
Quote Reply
Posted: January 15 2010 at 1:49pm |
|
I bought an acrylic router bit, and a guide for my router, so basically I'll just attach the guide and follow the lines drawn on w/ a sharpie, the guide will keep all the cuts an even length
Edited by CapnMorgan - January 15 2010 at 1:50pm
|
Steve My Old 180G Mixed ReefCurrently: 120G Wavefront Mixed 29G Seahorse & Softies Running ReefAngel Plus x2 435-8
|
|
Luckedout
Guest
Joined: October 11 2009
Location: Layton
Status: Offline
Points: 1495
|
Post Options
Thanks(0)
Quote Reply
Posted: January 15 2010 at 2:06pm |
|
Are you building this as more of a show tank or frag tank? This will be a pretty cool tank because you could keep you reef safe fish on one side and your not so reef safe/aggressive fish on the other. Best of both worlds!
What are you doing for a stand?
|
|
-Ben
90g Mixed reef
www.body-balancechiropractic.com
|
|
CapnMorgan
Guest
The Capn'
Joined: August 19 2009
Location: Tooele
Status: Offline
Points: 3537
|
Post Options
Thanks(0)
Quote Reply
Posted: January 15 2010 at 2:15pm |
A little of both I hope . The stand frame is made of angle iron and a couple flat cross braces, so after it's done being powder coated I will put a piece of laminated particle board across the top so the tank will be completely supported on the bottom. Then I'll just put a wood facade over the angle iron so it looks nice.
|
Steve My Old 180G Mixed ReefCurrently: 120G Wavefront Mixed 29G Seahorse & Softies Running ReefAngel Plus x2 435-8
|
|