140 gallon build - Updated 09/30
Printed From: Utah Reefs
Category: Main
Forum Name: Tank Threads
Forum Description: A place to show off your tank build.
URL: http://www.utahreefs.com/forum/forum_posts.asp?TID=49341
Printed Date: December 17 2025 at 2:22pm
Software Version: Web Wiz Forums 12.03 - http://www.webwizforums.com
Topic: 140 gallon build - Updated 09/30
Posted By: GentlemanBean
Subject: 140 gallon build - Updated 09/30
Date Posted: June 02 2011 at 1:14am
|
Although I've been planning it for a while, I though I'd start an official thread for my new tank build. I have had the skimmer for a while, one of http://www.elite-aquatics.net/ - Elite Aquatic 's (tcfab's) CS-150 cone skimmers. I just barely ordered the tank from The Aquarium and picked up the lumber for the stand. Tomorrow I will start on the frame for the stand. It will be built using the guidelines form http://reefcentral.com/forums/showthread.php?threadid=1567110 - this reefcentral thread . The tank will be a 140 gallon from deep sea aquatics which has the following dimensions: 48.5x24.5x29 I'm getting the "Show" model that comes undrilled and I'll be adding a coast to coast overflow with a http://reefcentral.com/forums/showthread.php?t=1541946 - bean style overflow . I'll be using all schedule 80 plumbing, a reeflow dart for return, 40w Emperor Aquatics UV sterilizer, 40 gallon breeder for a sump (this may change), two Vortech MP40s and two Aqua Illumination Sol Blue fixtures for lighting. From my old tank I'll be reusing my Neptune Systems Apex controller, 1 MP40 and my Precision Marine calcium reactor. Wish me luck!
------------- 
|
Replies:
Posted By: tcfab
Date Posted: June 02 2011 at 7:41am
awesome, looking forward to some pics ------------- Need custom acrylic work? give me a call, www.Elite-Aquatics.net (801)645-6386 |
Posted By: WhiteReef
Date Posted: June 02 2011 at 9:27am
|
Sounding great and I too am looking forward to some pics! ------------- ---------------- Richard Former 47G Column Reef, Magna 20" x 18" x 31"H |
Posted By: Jeremyw
Date Posted: June 02 2011 at 10:16am
|
Sweet cant wait to see it! ------------- Next meeting: |
Posted By: sunflashx
Date Posted: June 02 2011 at 4:05pm
Here's a pretty great example of a Coast to Coast w/Bean overflow if you haven't seen it yet. http://www.glassreef.com/basics_overflow.php - http://www.glassreef.com/basics_overflow.php
I'm not sure what your plan is there, but if I were me, I'd buy LVLs from Home Depot or wherever. http://www.homedepot.com/h_d1/N-5yc1v/R-202074262/h_d2/ProductDisplay?langId=-1&storeId=10051&catalogId=10053 - Home Depot LVL 9.5" seems to be a common height, run those through a table saw and halve them. I built my sump stand out of off the shelf dimensional lumber and I wouldn't ever do it again for a tank stand. I did the math for a standard size 180 I'd liek to move to, and unless I screwed something up, the frame is roughly $150 or less to build from engineered wood. ------------- http://www.utahreefs.com/forum/forum_posts.asp?TID=46633" rel="nofollow - 90G Display, 75G Basement Sump, "DIY" Avast Skimmer, DIY LED Array |
 GentlemanBean wrote:
Posted By: GentlemanBean
Date Posted: June 02 2011 at 4:45pm
I tend to be slightly obsessive and I have read so many different threads on Bean style overflows. I've already got everything completely planned out even though I don't even have the tank yet.  I originally wanted to get a custom tank with an external overflow box but in the end, I couldn't justify the cost since DSA had a stock tank that was the dimensions I was wanting. Consequently I'll have an internal c2c (or near c2c) overflow and it will be drilled from the back with three schedule 80 bulkheads. I originally wanted to get a custom tank with an external overflow box but in the end, I couldn't justify the cost since DSA had a stock tank that was the dimensions I was wanting. Consequently I'll have an internal c2c (or near c2c) overflow and it will be drilled from the back with three schedule 80 bulkheads.< ="utf-8">
I'm going with standard stud lumber 2x4s and 2x6s for the stand. It is cheap and will be more than strong enough. I plan to use a paint for the frame that will stand up to the marine environment. Thanks everyone for the comments and suggestions! -------------
|
Posted By: sunflashx
Date Posted: June 02 2011 at 5:32pm
It's not a strength thing, it's a straight, square, and level sort of thing. I picked through the wood, and built it on a flat level surface and when it all went together, my wood was definitely not straight or without twist. Maybe I'm just a bad carpenter, and engineered wood would cover my weaknesses.  ------------- http://www.utahreefs.com/forum/forum_posts.asp?TID=46633" rel="nofollow - 90G Display, 75G Basement Sump, "DIY" Avast Skimmer, DIY LED Array |
Posted By: GentlemanBean
Date Posted: June 02 2011 at 5:44pm
Ahhhh I see what you're saying. That is something I hadn't even considered. I'll be sure to check that after I complete the frame and I may make other plans if it is too out of whack. Thanks for the heads up! -------------
|
Posted By: sunflashx
Date Posted: June 02 2011 at 6:05pm
|
The back edge of my sump stand ended up low where it contacted the tank frame, too small of a gap to shim, and I wasn't sure I could shim it evenly along the length without torquing it some, so I ended up taping off the tank and the stand (hopefully to avoid the tank being completely glued down to the stand) and then set the empty tank in a bed of silicone along the back seam. I would have scrapped the thing if it had been for my display, but it sits over a floor drain on bare concrete... The sump was also only ever going to be like 2/3 full. ------------- http://www.utahreefs.com/forum/forum_posts.asp?TID=46633" rel="nofollow - 90G Display, 75G Basement Sump, "DIY" Avast Skimmer, DIY LED Array |
Posted By: GentlemanBean
Date Posted: June 04 2011 at 10:09am
|
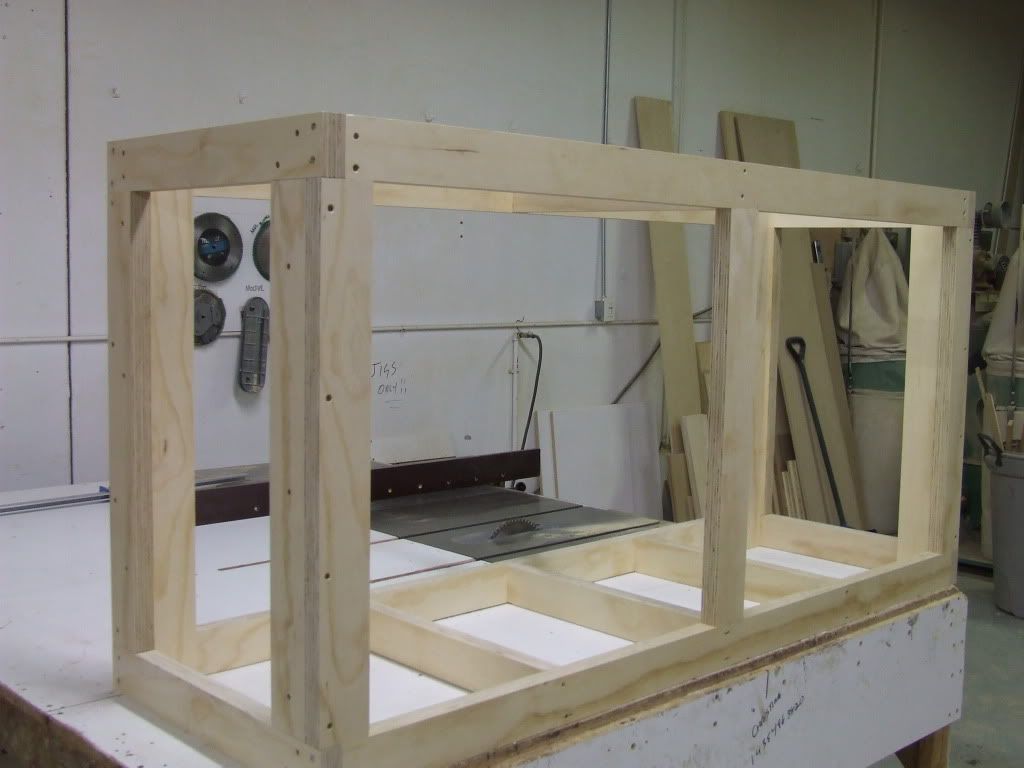
I finished constructing the frame yesterday. Some of the lumber dimensions were inconsistent so I used a hand plane to even them out. Everything turned out square and it is extremely sturdy but I don't have the tank yet to see if the top frame is flush with the tank. http://www.flickr.com/photos/godcore/5796870878/">  -------------
|
Posted By: Dion Richins
Date Posted: June 04 2011 at 10:46am
Looks nice. Very similar to what we build for the inside of larger stands.
 ------------- http://www.customaquariumfurniture.com" rel="nofollow - Bad "censored" Cabinets Best quality in the valley! He is one sexy bald guy, even with out a finger!(MAC) |
Posted By: Lewy
Date Posted: June 04 2011 at 12:05pm
|
Dion, yours looks more like ply wood than a 2x4 stud. what kind of wood is that? ------------- 40 gal w/ 20 sump |
Posted By: Trevor40
Date Posted: June 04 2011 at 12:12pm
|
Great build, I'm following along. ------------- Call or Text (801)834-3119 |
Posted By: Dion Richins
Date Posted: June 04 2011 at 1:55pm
|
Its 1.5" engineered lumber.I used to use 2x4's but had the same issue of not being consistent. ------------- http://www.customaquariumfurniture.com" rel="nofollow - Bad "censored" Cabinets Best quality in the valley! He is one sexy bald guy, even with out a finger!(MAC) |
Posted By: Lewy
Date Posted: June 04 2011 at 5:31pm
|
I love the open design. No vertal brace in the middle so you can get in to the sump. ------------- 40 gal w/ 20 sump |
Posted By: GentlemanBean
Date Posted: June 14 2011 at 11:01pm
|
My tank arrived at The Aquarium. Here is the the obligatory photo of my child in the tank: http://www.flickr.com/photos/godcore/5835118724/">  http://www.flickr.com/photos/godcore/5835118204/">  The tank came with black trim and a huge center brace. I decided to remove these and replace them with a eurobrace: http://www.flickr.com/photos/godcore/5834564479/">  http://www.flickr.com/photos/godcore/5835117136/">  I still have some cleanup to do to get rid of the last of the silicone and I still need to get the glass for the brace. Tyler recommended Kelly Stained Glass in Odgen. If anyone else has a glass supplier recommendation, please let me know.
-------------
|
Posted By: bstuver
Date Posted: June 14 2011 at 11:12pm
Your dog cracks me up! Nice looking build however I look at a tank that big without a brace on the bottom and just cringe  ------------- Jackie Stuver "wait these aren't the happy Hawaiians oompa doompa godly heaven on your face zoas? I dont want them then. lol!" Ksmart |
Posted By: GentlemanBean
Date Posted: June 14 2011 at 11:23pm
lol. didn't mean to scare you. i didn't remove the brace from the bottom. only the one on the top. the bottom brace will be covered by the stand trim -------------
|
Posted By: bstuver
Date Posted: June 14 2011 at 11:41pm
|
Whew ok good!! I was worried:) ------------- Jackie Stuver "wait these aren't the happy Hawaiians oompa doompa godly heaven on your face zoas? I dont want them then. lol!" Ksmart |
Posted By: GentlemanBean
Date Posted: June 22 2011 at 6:14pm
|
Here is post including all of the recent tank developments. After hours and hours of scrubbing with steel wool, I got all of the leftover silicone off. Then I ordered my glass from Kelly Stained Glass. I went with 3" wide 1/2" thick starphire glass and RTV 108 silicone from Momentive. After a couple of failed attempts to get a solid and professional looking silicone seam, I finally got it down. Here is the first piece which is currently curing: http://www.flickr.com/photos/godcore/5861147589/">  Once that one is cured I'll do the other long side followed by the two short sides. http://www.flickr.com/photos/godcore/5861700066/">  I aslo received my bulkheads from BRS but decided that 1.5" was way to big and I'm returning them for 1" schedule 80 bulkheads. Finally, I got a hammerhead from Dion for a smoking deal. I took it apart to clean it and noticed the seals were looking near the end of their life. After looking online and only finding them for $60 plus shipping, I tried contacting reeflo directly and they sent me a new set for $30 shipped! -------------
|
Posted By: GentlemanBean
Date Posted: July 07 2011 at 12:15am
|
Update: The glass for the side panels of the eurobrace was cut too short so I had to have the glass supplier re-cut them (Thank you again Tyler for picking those up for me and saving me a trip to Ogden!). I drilled all three holes for my siphon overflow and Tyler is working on making me the best overflow box ever < ="utf-8"> . Tyler also finished my custom sump and it looks gorgeous! I really can't recommend his acrylic work enough. His prices are so cheap for the incredible quality that you get. . Tyler also finished my custom sump and it looks gorgeous! I really can't recommend his acrylic work enough. His prices are so cheap for the incredible quality that you get.I replaced the seals on my Reeflo Hammerhead and ordered all of my plumbing from bulk reef supply. It ended being really expensive because I went all schedule 80 but I think it is worth it. I really like the look of schedule 80 and the added piece of mind is nice too. I also got a bunch of gorgeous dry pukani rock from The Aquarium and two 40lb bags of Caribsea special grade sand. The rock is currently cycling in a large rubbermaid garbage can. The big purchases left are the AI LED fixtures, UV and the facade for the stand. The plumbing is scheduled to be delivered Monday afternoon and I'm going to take Tuesday off work to get it installed ASAP (yes I am that impatient to get water in this thing  ). ).I'll leave you with a quick current shot of the tank: http://www.flickr.com/photos/godcore/5910807365/">  -------------
|
Posted By: Rex
Date Posted: July 07 2011 at 10:57am
|
Can't wait to see this up and running. Funny thing though, when you said "Bean style overflow", I thought it was your own personalized style of overflow. Only because your forum name is "GentlemanBean" ------------- http://zip-zero.com/wmas/imageUpload.php |
Posted By: GentlemanBean
Date Posted: July 07 2011 at 1:03pm
Ha ha! Nope just a coincidence. The overflow design is from Bean Animal on the reefcentral.com forums. -------------
|
Posted By: GentlemanBean
Date Posted: July 10 2011 at 5:31pm
|
The stand is now in its final location but I'm waiting to shim it until I have the empty tank on top. http://www.flickr.com/photos/godcore/5923412853/">  I picked up my overflow box from Elite Aquatics (tcfab) and got that drilled and installed. The overflow turned out so awesome. It is only as deep as the eurobracing and 5.5 inches tall so it doesn't take up a ton of real estate. It does extend across 41" of the available 47" though so I should be getting excellent surface skimming. http://www.flickr.com/photos/godcore/5923959202/">  http://www.flickr.com/photos/godcore/5923961512/">  http://www.flickr.com/photos/godcore/5923396669/">  -------------
|
Posted By: bstuver
Date Posted: July 10 2011 at 5:39pm
|
Nice! It's going to be awesome! ------------- Jackie Stuver "wait these aren't the happy Hawaiians oompa doompa godly heaven on your face zoas? I dont want them then. lol!" Ksmart |
Posted By: tcfab
Date Posted: July 10 2011 at 7:47pm
|
Looking good Your getting quite a collection of EA equipment ------------- Need custom acrylic work? give me a call, www.Elite-Aquatics.net (801)645-6386 |
Posted By: GentlemanBean
Date Posted: July 10 2011 at 8:04pm
Ha ha seriously. It is like my tank is sponsored by Elite Aquatics! -------------
|
Posted By: GentlemanBean
Date Posted: July 21 2011 at 11:20pm
|
Okay wow it has been a while since an update. I honestly have been too frustrated to update this thread. First my bulkheads were leaking... No matter what I did, I continued to have leaks from my primary and secondary bulkheads. I finally realized that I needed an additional gasket between the inside wall of the overflow box and the bulkhead. Without this second bulkhead, water would wick along the threads of the bulkhead and create a slow leak. Second, I realized that my return wasn't going to work so I switched to a Reeflo Dart (thank you Brad@ The Aquarium for hooking me up). While I am very happy with the Dart, this means I had to redo all of my plumbing other than my return lines. Finally, I had slow leaks from almost all of the threaded joints in my return lines. I tried redoing my teflon tape and tightening the fittings as much as possible. However, I still had leaks! After researching this online, it looks like teflon tape works well for with smaller pvc pipes but you can have issues with teflon tape and pvc of 1.5" and larger. Today I switched to teflon paste and didn't have a single leak! (Additionally, teflon tape doesn't work well between the pvc fittings and the fiberglass of the Reeflo Dart) So I've now got everything running without any issues. The bean animal overflow is completely silent and is handling an insane amount of flow. You seriously can't even hear the overflows. I'll post a video tomorrow and try to capture how silent the system is. -------------
|
Posted By: GentlemanBean
Date Posted: July 25 2011 at 9:31pm
|
The tank is finally finished and now I just have to complete the stand. Here is video showing it all in action. (You can view it in HD http://www.youtube.com/watch?v=EQ8_cq9t5OU&hd=1 - here ) Let me know what you think of the aquascape! -------------
|
Posted By: tcfab
Date Posted: July 26 2011 at 12:12am
Looking good man. Now the long wait to cycle it huh ------------- Need custom acrylic work? give me a call, www.Elite-Aquatics.net (801)645-6386 |
Posted By: ptronsp
Date Posted: July 26 2011 at 3:38pm
|
Looking good! I am looking forward to following this :) Pam ------------- The only clowns I like are in my tank! |
Posted By: TriggerHappy
Date Posted: July 26 2011 at 5:06pm
|
Nice job, looks great! ------------- 210 gallon Mixed Reef |
Posted By: GentlemanBean
Date Posted: August 08 2011 at 12:56am
|
I just redid my return lines and I'm really happy with how it turned out. I drilled through the eurobrace and then used uniseals and pvc street elbows to give it a nice clean look. I couldn't find any schedule 80 threaded x slip street elbows so I just painted some schedule 40 ones black. I also went ahead and made the screen top while I was at it. http://www.flickr.com/photos/godcore/6020544971/">  http://www.flickr.com/photos/godcore/6020544829/">  http://www.flickr.com/photos/godcore/6021098054/">  I also ordered my lights and they should be here on Wednesday! I can't wait! -------------
|
Posted By: bstuver
Date Posted: August 08 2011 at 1:11am
|
Those returns look awesome I really like those. ------------- Jackie Stuver "wait these aren't the happy Hawaiians oompa doompa godly heaven on your face zoas? I dont want them then. lol!" Ksmart |
Posted By: Nick801
Date Posted: August 08 2011 at 11:59am
| Looks good man, now you need to change out your signature =) |
Posted By: GentlemanBean
Date Posted: August 08 2011 at 12:04pm
Thanks! I took me forever to come up with a design that I liked but I'm really happy with how it turned out. -------------
|
Posted By: GentlemanBean
Date Posted: August 08 2011 at 12:05pm
lol. Once the lights are over it, I'll update my sig -------------
|
Posted By: BobC63
Date Posted: August 08 2011 at 2:11pm
|
Very cool design Scott! ------------- - My Current Tank: 65g Starfire (sitting empty for 2+ years) - * Marine & Reef tanks since 1977 * |
Posted By: Adam Blundell
Date Posted: August 08 2011 at 3:36pm
|
Very slick looking. I dig it.
Adam ------------- Come to a meeting, they�re fun! |
Posted By: CapnMorgan
Date Posted: August 08 2011 at 5:16pm
|
Looking good! ------------- Steve http://utahreefs.com/forum/forum_posts.asp?TID=40637&PID=356246" rel="nofollow - My Old 180G Mixed Reef Currently: 120G Wavefront Mixed 29G Seahorse & Softies Running ReefAngel Plus x2 435-8 |
Posted By: GentlemanBean
Date Posted: August 15 2011 at 12:35am
|
I received my lights that I purchased from reefcentral and I couldn't be happier! The leds look awesome and it will really reduce the cost of running a tank this size. Right now I'm only using 1/4 of the leds while my corals acclimate but here is a quick shot. http://www.flickr.com/photos/godcore/6044796398/">  I've moved my controller and all the equipment over to the new tank and everything seems to be doing well. The outlet near the tank is just a normal outlet and rather than replace it with a gfci I did something a little different. I made a power box that has two gfci's wired in parallel. That way if one trips, the other will still have power. I also used a water resistant housing and added a cover to prevent any spraying water from hitting the outlets. I'm really happy with how this turned out. http://www.flickr.com/photos/godcore/6044246295/">  It is so nice to have life in this tank after all this hard work! Thanks everyone for following along :-). -------------
|
Posted By: GentlemanBean
Date Posted: September 05 2011 at 1:40pm
|
Here is a quick update for September. I finally added a UV sterilizer (54w AquaUV Sterilizer w/ wiper upgrade). I also got a new permanent resident for my refugium (a mantis shrimp!) but so far it has been impossible to get a good picture of it. http://www.flickr.com/photos/godcore/6117407108/">  I also added a few fish (hippo tang, sailfin tang, unknown bristle tooth tang and a hellfrichi firefish) Here are a couple of shots: http://www.flickr.com/photos/godcore/6116862149/">  http://www.flickr.com/photos/godcore/6117407324/">  -------------
|
Posted By: bstuver
Date Posted: September 05 2011 at 1:50pm
|
That is going to look so cool when it is filled in!! Looking awesome so far. ------------- Jackie Stuver "wait these aren't the happy Hawaiians oompa doompa godly heaven on your face zoas? I dont want them then. lol!" Ksmart |
Posted By: GentlemanBean
Date Posted: September 07 2011 at 8:23pm
|
Here is a shot of our newest residents. They were actually added almost a week apart but they seem to be getting along well. http://www.flickr.com/photos/godcore/6125431269/">  -------------
|
Posted By: DLindquist
Date Posted: September 07 2011 at 9:24pm
|
Awesome rock work. ------------- A government strong enough to give you everything you want, is powerful enough to take everything you have. |
Posted By: GentlemanBean
Date Posted: September 30 2011 at 10:53pm
Thanks! After having it stocked for a couple of months, I'm really glad that I left the sand open and uncovered. It makes working on the tank really easy. -------------
|
Posted By: GentlemanBean
Date Posted: September 30 2011 at 11:07pm
|
I finally was able to take a short video that shows my tiny green mantis. He is relatively plain but his little eyes are funny and he always comes out to watch me when I'm near his tank. You can watch it full size http://youtu.be/BAkpr2Gz7-w?hd=1 - here . -------------
|