210 Mixed Reef Build
Printed From: Utah Reefs
Category: Main
Forum Name: Tank Threads
Forum Description: A place to show off your tank build.
URL: http://www.utahreefs.com/forum/forum_posts.asp?TID=73961
Printed Date: February 07 2026 at 8:45pm
Software Version: Web Wiz Forums 12.03 - http://www.webwizforums.com
Topic: 210 Mixed Reef Build
Posted By: relethg
Subject: 210 Mixed Reef Build
Date Posted: December 07 2014 at 7:47pm
|
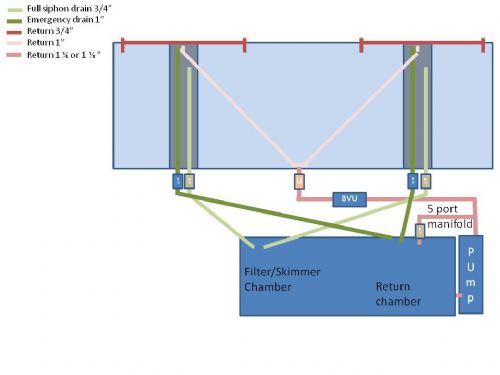
Hi all, Starting 210 gallon mixed reef build. I am not in a hurry (does everyone say this?) and will want help planning the build and with all the issues I will have. I have a (72"X24"X29) good used all-glass RR double overflow tank with nice stand and canopy. The Canopy has 3 150 watt MH, 4 compacts and 3 moon lights in one 72" fixture. I will be keeping the lights as this setup is proven. The stand is in great shape and I think beautiful. I bought the tank knowing I was not crazy about the RR dual over flows. The holes drilled are for 3/4 and 1 inch ID pipe in each overflow. What can I do to make this as flood proof as possible without gutting the overflows (I think Herbie)? I will have room in sump for power out water. Dont plan on using check valve because it doesn't look like you can trust them anyway. What I have now and will use: 210 gallon RR All-Glass tank (double over flow) Stand and canopy Light fixture with 4 CF, 3 MH, and 3 moon lights 100 gallon a day RO Here are my objectives: Healthy system Ease of care Automated Reliability Safety (no floods) Beautiful Everything contained below the tank except quarantine tank and RO.
So let's start with
my draft plumbing: Don't focus to much on the sump at this point I will soon have a post on this (waiting for word on custom build plans). There will be a filter sock chamber (3 each 4"X14") that the full siphon drains go to. This feeds into the skimmer chamber that feeds into the Return chamber. The Refugium will be fed by either a 25% split off the drain or return, have not decided yet. What do you think about the 25% flow and clean or dirty water? My focus at this point is the Herbie style drains in my RR 210 gallon double over flow. The two overflows are drilled for 1 and 3/4 inch drains and returns. I will be putting over the back returns on as depicted by the red. The 3/4" line in the overflows will be the full siphon line and the 1" will be the emergency. The emergency goes into the return. This should cause lots of bubbles in the return if the primary gets plugged and will detune the pump some. Still have not picked the return pump, looking for reliable and quite external 1800-3000 GPH. The Reeflo hybrid Snapper/Dart Gold is in there as is the Waveline DC1200 Gen II. Leaning towards the Reeflo at this point.
Thoughts? Glenn |
Replies:
Posted By: Mark Peterson
Date Posted: December 07 2014 at 9:54pm
A siphon drain setup with an emergency drain is pretty much fail proof.  When doing a siphon drain like that, I make a screen over the standpipe so that nothing has a chance of clogging the gate valve. The more common ball valve is not used here because a Gate Valve can allow the more precise adjustment required of this kind of set up). I have one of these set up and running on a 180 gal. dual overflow in North Salt Lake. Let me know if you would like to go see it. It's been running for ~3 years without incident. Pictured below is the 60"x12"x48" frag tank I had in 2010-11 utilizing a full siphon overflow without an emergency drain. The overflow was facing forward in order to be completely accessible. The overflow teeth were removed to allow 1200 gph down the drain which was a 1" bulkhead immediately bushed up to 2" pipe so the water could enter more easily. I found that rubble in the bottom of the chamber stopped the bubbles which were created by the fast water flow, bubbles that occurred even though the waterfall height was adjusted to only ~1/2" to 1". 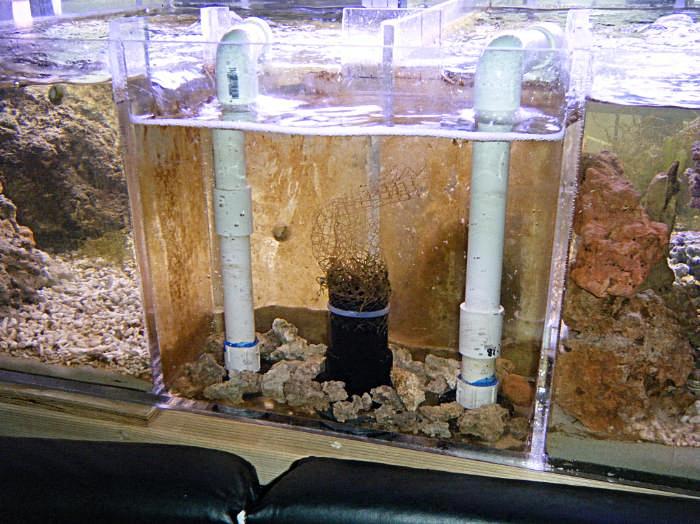 The stiff netting tended to collapse when it became more clogged, so I later devised a solid frame to prevent collapse. Pics may follow in a later post. 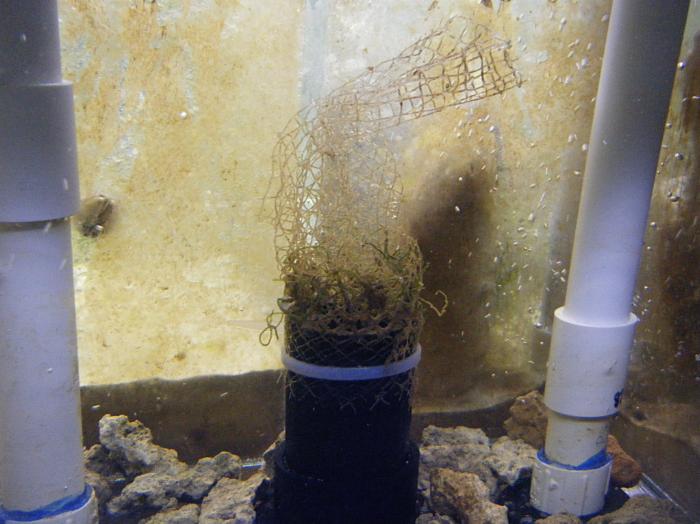 Aloha
 ------------- Reefkeeping Tips, & quick, easy setup tricks: www.utahreefs.com/forum/forum_posts.asp?TID=9244 Pay it forward - become a paid WMAS member
|
Posted By: Mark Peterson
Date Posted: December 08 2014 at 6:59am
|
The toothed overflow is the flow limiting point in this kind of setup. It does no good to have a +1000 gph pump when the toothed overflow cannot handle more than that. Typically, the manufacturers make the spaces between teeth smaller than the teeth themselves when it should be just the reverse. (You may have noticed that I often disagree with manufacturers designs, preferring instead to make modifications to improve efficiency.) Direct the emergency drains wherever you want. It makes no difference because with good screens, the main drains will never clog. I would recommend using the 1" holes for the main drains and the 3/4" holes for the emergency drains, bushed up to larger diameters of course, to increase the length of the spillway. Why this "There will be a filter sock chamber (3 each 4"X14")", when there are only two drains? I disagree with filter sock chambers and other baffled chambers except a barrier just tall enough to separate the full floor sand bed from the external pump intake. Come take a look at the 180 gal. I maintain in NSL. There are no filter socks on this setup, for good reason. Aloha ------------- Reefkeeping Tips, & quick, easy setup tricks: www.utahreefs.com/forum/forum_posts.asp?TID=9244 Pay it forward - become a paid WMAS member
|
Posted By: relethg
Date Posted: December 08 2014 at 5:01pm
I will use the mesh type screen and have gate valves specked. Would love to see the 180 in NSL. Let me know what would work for you via text or IM (I have Friday off).
I have an area for ruble where the the drains dump into the sump. You ask in you other post why two socks or socks at all. The drains dump into an area and then go over a waterfall into the 3 socks on the way to the skimmer. I will run socks when I need to, not much , or not at all, but wanted the ability. |
 Mark Peterson wrote:
Posted By: relethg
Date Posted: December 08 2014 at 5:13pm
I like the idea of opening the gap between the teeth and think I will do that. I have been struggling with this as others have brought this issue up. How do I estimate flow when I have know idea what the teeth will flow. This is one thing that is keeping me from specking the pump. I under stand about the screens and will use them, but I am concerned with the ability of the 3/4" drains backing up the 1". I think I will see what I can get out of the 3/4" drains. They will not be sch40 but 200 instead and that should allow for more flow (bigger ID). I will neck up the inlet and the outlet to try and increase flow. Thanks so much for providing your thoughts and I hope more folks chime in. Glenn
|
Posted By: relethg
Date Posted: December 09 2014 at 5:31pm
|
Was hoping to get more feedback. Here is the updated drawing. Not much has changed but wanted to point out the drains will be flex line after the valves to the sump (nylon reinforced). Would like some pros and cons of just using one pump for return and to drive the manifold that will supply reactors and other needed system distribution. Another thing I am questioning: I see most people do a hard connection between pump and sump and outlet plumping. Why is no one using the rubber connections used for a home water pump. This would isolate vibration from the plumbing and reduce the likely hood of cracks in the plumbing. These connections are strong and readily available at plumbing supply stores.  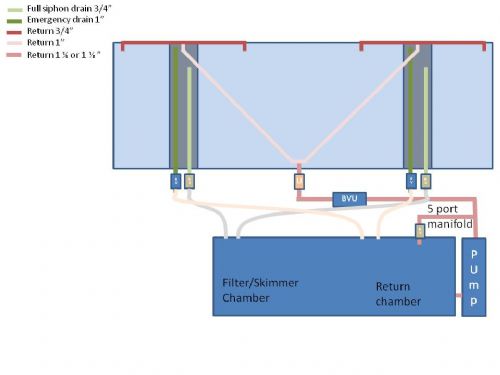 |
Posted By: relethg
Date Posted: December 09 2014 at 5:46pm
Here are the returns over the back. I don't have the line Lock installed yet.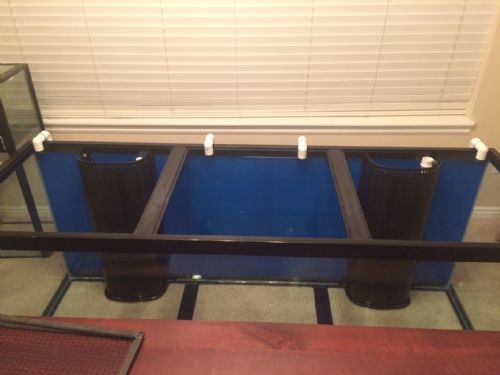  |
Posted By: relethg
Date Posted: December 09 2014 at 5:55pm
canopy and lights.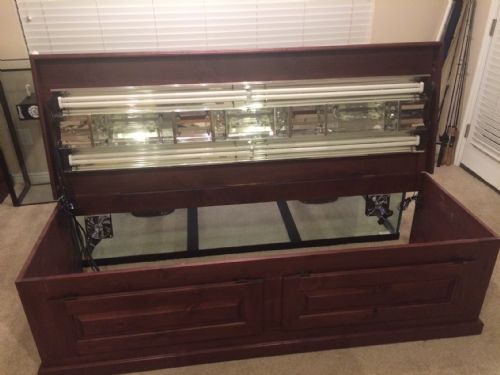 |
Posted By: faviasteve
Date Posted: December 09 2014 at 9:22pm
|
Rubber connections with stainless steel hose clamps may work for an external (not submerged) return pump but they are a very bad idea for a submerged pump. Stainless steel will corrode in saltwater over time and whatever it releases (chromium is my guess) poisons inverts. I lost all the snails in my first tank because of corroding stainless steel hose clamps. I think the return plumbing looks good. I agree with Mark that the thin slots in the toothed overflows are not well designed. They can be widened with a dremel tool or a large section of teeth can be cut out and a plastic mesh/grate attached over the hole. This will work well for flow but may not look "professional" depending on your skill with plastic.
------------- Steve Burton Logan, Utah |
Posted By: P.Kapp
Date Posted: December 09 2014 at 11:53pm
|
Your plumbing setup is very similar to mine. I also have a 210 and ran my returns over the back of the tank and did Herbie style drains inside the overflows. I have had snails make their way into the main siphon drain, but the back up has always been great. Never any issues. I left the ends of the backup drains that go into the sump area just above the water line so that they would make a splashing noise and I would know if the siphon drain was clogged. Usually just opening the gate valve on the siphon would clear the block, and I readjust it back to normal. Something that I did with my external pump was use spa flex to help with the vibration. Most of my plumbing is PVC, but on each end of the pump there is some spa flex. That way you can glue it right together and not worry about clamps. Good luck with your build! Your stand looks great! ------------- Preston Kapp 210 Gal Reef |
Posted By: relethg
Date Posted: December 10 2014 at 3:44am
faviasteve thanks for inputs and the heads up on the clamps, this will be external pump.
I will figure out away to open the flow up by either making the gap bigger in the teeth or removing them and putting something else in there place. No plastic skills yet. Thanks Glenn
|
Posted By: relethg
Date Posted: December 10 2014 at 3:48am
P. Kapp, did you do anything with the teeth on the overflows? Do you have 3/4 and 1 lines in the overflows? What line did you use as the siphons, 3/4 or 1? If you did anything to the teeth on the overflow do you have a picture? Lastly what kind of pump did you go with and what do you figure your flow is? Thanks Glenn
|
Posted By: Mark Peterson
Date Posted: December 10 2014 at 7:47am
|
Why don't we use those rubber patch couplings? No matter how much they are tightened, they allow "salt creep" and the salty humid environment inside the aquarium stand swiftly rusts the metal clamps. . "Salt creep" can become a horrible mess, a maintenance nightmare and a destroyer of metal. How do we avoid this? We use flexible PVC pipe (spa flex) and PVC slip (glued) fittings wherever possible. We use teflon tape to ensure a proper seal on all threaded fittings Sorry I didn't see it sooner and say something but, four return lines is going to be counter productive to flow. Make it one, or no more than two, return lines so the return pump can actually move some water within the tank. This idea is not readily intuitive because it's a unique situation in flow dynamics. In a box of water, a strong stream creates a good current. If that strong stream is split up, the strength of the water current within the box decreases exponentially, yes, exponentially. So what do we do to get good flow? First of all we don't depend on the return pump for flow. We use powerheads inside the aquarium. A typical overflow limits the amount of water that can be pumped back into the tank to less than 700 gph(typical overflow). Instead, we use stream powerheads inside the tank to create the flow necessary for coral growth. Remember the 1300 gph stream pumps sitting on the bottom of my 40 gal tanks? (Note: When I use the term "we", I'm referring to hobbyists. Maintenance companies are different. They don't often provide the complexity of equipment and almost daily monitoring required to keep more difficult coral like Acropora. For tanks in a dentist office where the death of a sensitive coral would be a catastrophe, the flow from a return pump is sufficient to keep hardy coral or just fish and LR.) Why does more water current grow coral better? People don't like a windy day, but coral actually thrive on constantly "windy days". It has to do with respiration and excretion. Coral are animals, but they can't move. They need water to flow past them to take away CO2 and bodily waste and they need water current to bring O2 and food to them. Aloha, Mark P.S. P.Kapp would find it useful to add a screen to the top of the siphon drain to keep Snails out of the Gate Valves. I'll post some pics later today. ------------- Reefkeeping Tips, & quick, easy setup tricks: www.utahreefs.com/forum/forum_posts.asp?TID=9244 Pay it forward - become a paid WMAS member
|
Posted By: Mark Peterson
Date Posted: December 10 2014 at 8:08am
More about fluid dynamics and design engineering... I don't know about you, but for me, the son of a Rocket Engineer, it's logical to use the best equipment (1" drain hole) for the main system and rely on lesser equipment (3/4" drain hole) as a backup in case performance degrades in the main system. As P.Kapp mentioned, what typically happens is that a Snail shell clogs the drain. Flow typically decreases but does not stop altogether. The backup drain can then make up for the lack. But wait, why should we even allow a snail shell to enter the drain. Why not design it so that can't happen, ever? Aloha ------------- Reefkeeping Tips, & quick, easy setup tricks: www.utahreefs.com/forum/forum_posts.asp?TID=9244 Pay it forward - become a paid WMAS member
|
Posted By: relethg
Date Posted: December 10 2014 at 5:24pm
I would have never guessed that these connections could not stop salt creep. I help my brother maintain is 42" twin Caterpillar boat and these connections are used every place salt water is moved. Thanks for the heads up.
OK, the tank game plumbed with 2 returns with 2 loc lines on each. I thought I should use all four. I can cap two.
I have two power-heads on my list of equipment and understand there need and use. I just see many large hobbyist tanks with 4 loc line returns or more, they are just on two lines not 4. I did notice your return flow appeared low but the in tank circulation was high. At what rate are you turning your water over at? I do plan on modifying my overflows so they will flow more. I would like to get close to 2000 GPH through the sump.
I understand this. Mark thanks for your input it is appreciated. |
Posted By: P.Kapp
Date Posted: December 11 2014 at 12:18am
|
P. Kapp, did you do anything with the teeth on the overflows? Do you have 3/4 and 1 lines in the overflows? What line did you use as the siphons, 3/4 or 1? If you did anything to the teeth on the overflow do you have a picture? Lastly what kind of pump did you go with and what do you figure your flow is? Thanks Glenn [/QUOTE] I bought my tank used and it already had the overflow teeth cut out on every-other tooth. My drains are both 1" inside each overflow, but I think you'll be fine with the 3/4". If one of your siphons fails, you still have two 3/4" drains as back ups. My pump is a reeflo dart, and it also came with the tank. I ran two return lines with a Y in the loc lines like Mark is talking about. For supplemental flow in the tank I run one mp60, and two mp40's, but they are turned down quite a bit. ------------- Preston Kapp 210 Gal Reef |
Posted By: relethg
Date Posted: December 11 2014 at 8:05am
|
I have been considering the Snapper/Dart hybrid. Do you like the dart? Does it flow enough? Is it quiet? Are you using one pump for return and manifold? I was thinking of two MP40s. Do you think they will be sufficient? Do you have some pictures of your tank and sump? Thanks Glenn |
Posted By: Mark Peterson
Date Posted: December 11 2014 at 8:35am
The tank I was suggesting that you visit with me and see uses a Snapper, but it's valved back to ~60% flow. This 180 gal reef has no other circulation. That's right, no MP or WP propeller pumps, not even a Maxijet. Many would call this tank extremely low tech, but coral grows massive for this hobbyist. You ought to see it soon. Aloha, Mark ------------- Reefkeeping Tips, & quick, easy setup tricks: www.utahreefs.com/forum/forum_posts.asp?TID=9244 Pay it forward - become a paid WMAS member
|
Posted By: relethg
Date Posted: December 11 2014 at 9:05am
I do want to see the 180 gallon. I said in response to the first post you mention the tank that I want to look at it and let me know what works for you. I have Friday and the weekend off or after work. Thanks Glenn |
Posted By: relethg
Date Posted: December 14 2014 at 2:26pm
Here is the before and after shots of the overflows. This should flow more than that close teeth setup. I ran it above the overflow so it will touch the screens that sit on top of the tank. No carper surfing. The material is plastic mesh gutter guard from HD. 20' was $4. I have 18' left if anyone needs some. I will use this for my drain screens too.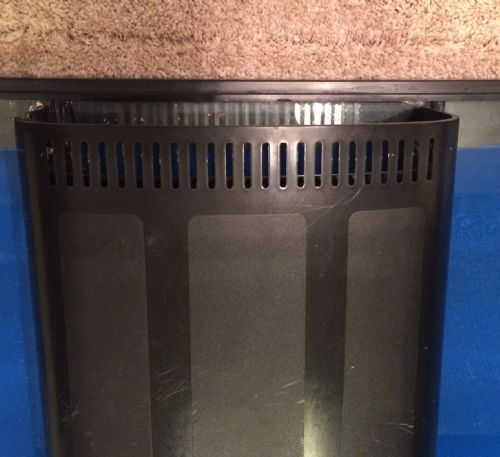  |
Posted By: Mark Peterson
Date Posted: December 15 2014 at 8:50am
|
Excellent job. That will work perfectly. I would like some of that material. You saw, (or couldn't see) the drain screens on Ross Bagshaw's 180. I tried to take some pics but since this tank has been running so well with those screens over the siphon drains since 2011, the lush growth on the glass and on the screens obscured even the best image(below). After almost 4 years running continuously and quietly without incident, it's time to do a little maintenance. Hope you learned a lot during your visit. Ross was very pleased to show off his tank.  Aloha 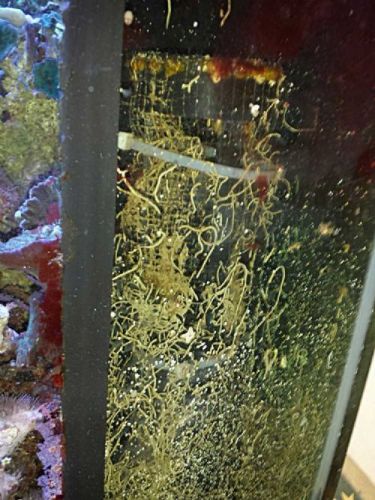 ------------- Reefkeeping Tips, & quick, easy setup tricks: www.utahreefs.com/forum/forum_posts.asp?TID=9244 Pay it forward - become a paid WMAS member
|
Posted By: relethg
Date Posted: December 15 2014 at 11:28am
|
I learned a ton and thanks again for the visit, Ross is a great guy. Let me know when you are up this way and you can have what you want. Or I will let you know when I am down that way. Glenn |
Posted By: relethg
Date Posted: December 19 2014 at 5:52am
Here is the way I did the drain line screens. What do you think?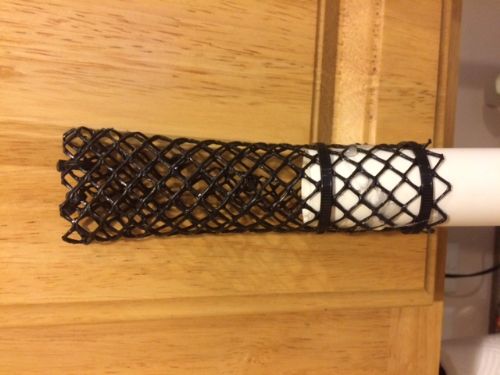 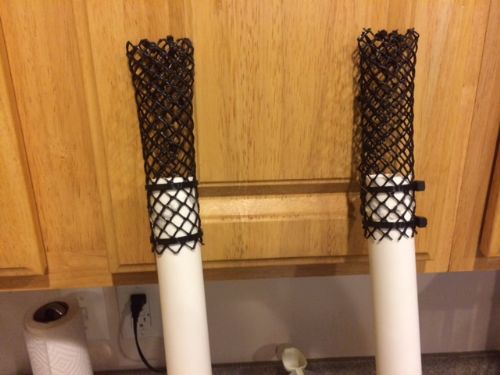
|
Posted By: relethg
Date Posted: February 17 2015 at 9:21pm
It has been a while and have made progress. Here are the pictures of the salt water mixing station. It will do 40 gallon batches. It has heater and circulation pump that mixes the water and keeps it stirred. I can pump RO or salt water to any place in the house. It is nice to be able to do water changes without lugging buckets. The second RO line goes up stairs to the ATO tank for the 45 gallon shallow reef. I use the yellow barrel funnel for mixing the salt. Put the amount in and wash it down with the Lin-Loc nozzle. Works great.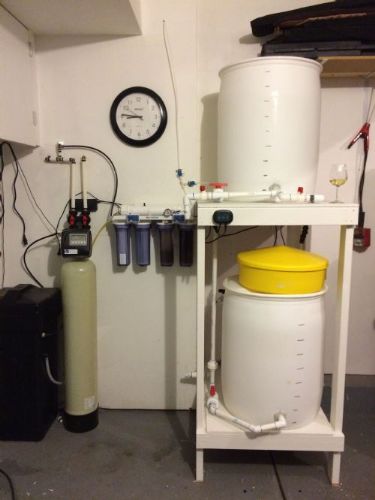   ------------- 210 G Filled 18 Mar 15 120 G Filled 11 Jun 16 |
Posted By: Mike Savage
Date Posted: February 18 2015 at 3:27pm
|
It looks like a great setup. -------------  |
Posted By: Shane H
Date Posted: February 18 2015 at 3:58pm
| Nice. Well thought out. |
Posted By: relethg
Date Posted: March 15 2015 at 8:17pm
I know this has been going slow but that is OK with me. Plumbing is complete and wiring is about 95% done. Have the Apex about half programed. Trying to get everything under stand is so hard.  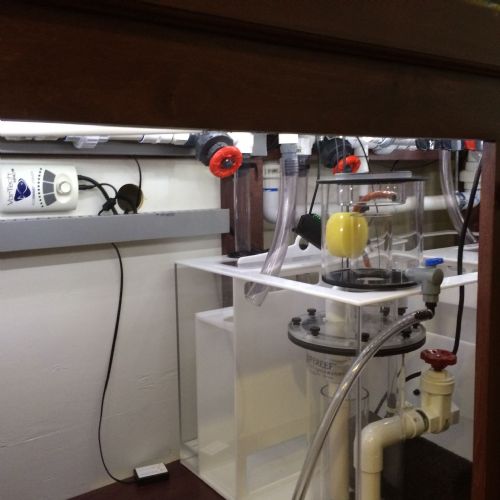 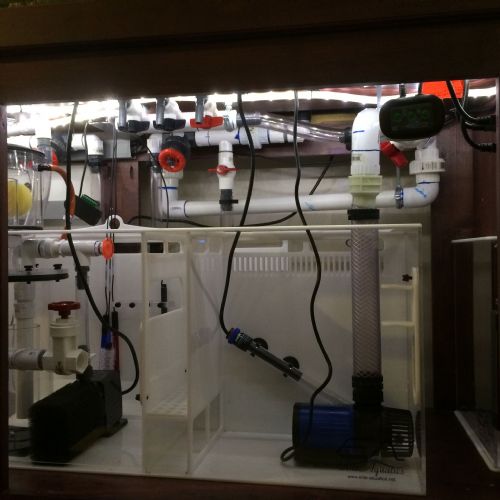 ------------- 210 G Filled 18 Mar 15 120 G Filled 11 Jun 16 |
Posted By: relethg
Date Posted: March 15 2015 at 8:22pm
Started the aquascaping this weekend and hope to have it done by the end of the week. This is so fun, building is as fun as reef keeping. Using all dry rock and will seed the tank with rock from my 45 gallon.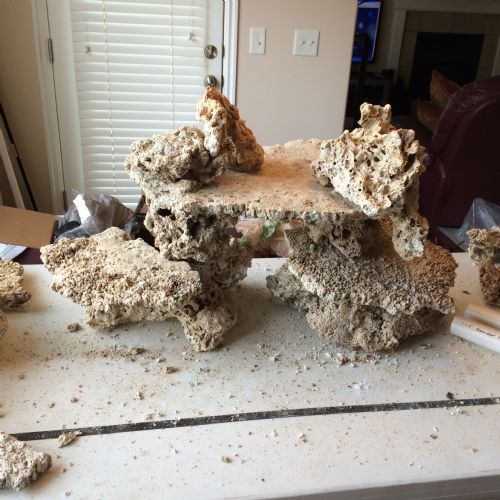  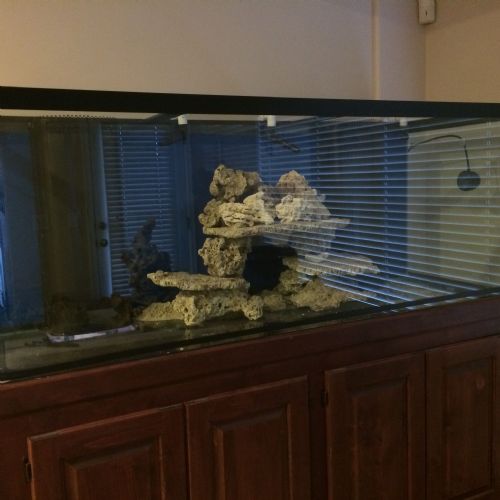 ------------- 210 G Filled 18 Mar 15 120 G Filled 11 Jun 16 |
Posted By: faviasteve
Date Posted: March 15 2015 at 10:31pm
|
The flat shelf rocks are very nice. They're artistic and very functional. The top plate would be great for mounting sps frags. The lower shelves should work well for setting colonies on with a flat base like hemispherical brains, chalices, etc. Everything looks great. ------------- Steve Burton Logan, Utah |
Posted By: Hogie
Date Posted: March 16 2015 at 12:33am
| Wait, you're in Farmington? I'm in Farmington! I'd like to come look at it in person if you're up for visitors. PM me. |
Posted By: relethg
Date Posted: March 16 2015 at 8:07am
My wife and I was thinking the same thing (she designed, I built). All the rocks on the front of the top shelf are just placed so they can be removed. We plan on mount coral by attaching them to a rock and placing the rock on the plate. This will make fragging and moving things easier. We will do small tower of rocks on the left and stack of rocks against back on the right. Sure hope I am putting water in it this weekend. Thanks for the comments. ------------- 210 G Filled 18 Mar 15 120 G Filled 11 Jun 16 |
Posted By: relethg
Date Posted: March 16 2015 at 10:36pm
Finished the rocks and now adding the sand. Need to clean 8 more gallons of sand tomorrow and add a few gallons of water.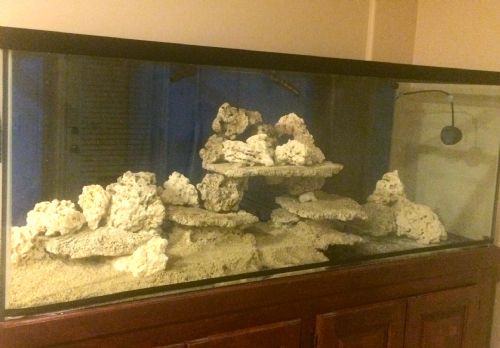 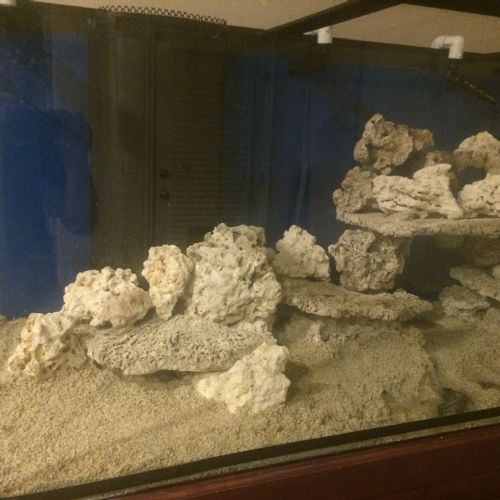 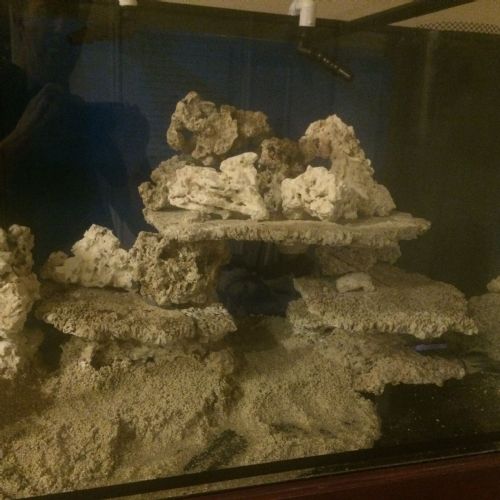 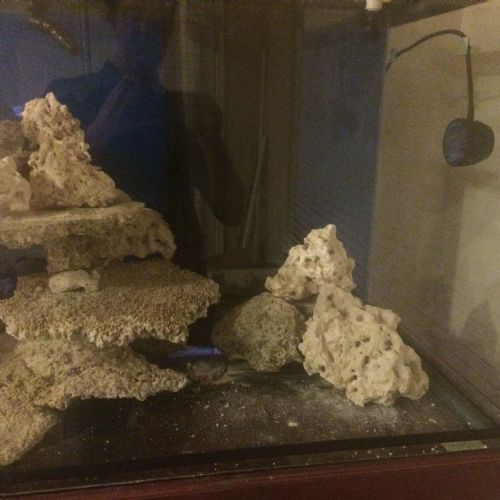 ------------- 210 G Filled 18 Mar 15 120 G Filled 11 Jun 16 |
Posted By: Hogie
Date Posted: March 17 2015 at 12:04am
| It was a pleasure to meet you and your wife. Set up was awesome to see! I'm excited to see it when it's all up and and going. |
Posted By: Mark Peterson
Date Posted: March 17 2015 at 7:55am
|
Nice. ------------- Reefkeeping Tips, & quick, easy setup tricks: www.utahreefs.com/forum/forum_posts.asp?TID=9244 Pay it forward - become a paid WMAS member
|
Posted By: relethg
Date Posted: March 17 2015 at 8:59am
|
It was nice meeting you and your wife. We are excited we are so close to getting water in it. ------------- 210 G Filled 18 Mar 15 120 G Filled 11 Jun 16 |
Posted By: relethg
Date Posted: March 17 2015 at 9:00am
|
Little worried I don't have enough rock higher in the water column. Thoughts? ------------- 210 G Filled 18 Mar 15 120 G Filled 11 Jun 16 |
Posted By: Bryce
Date Posted: March 17 2015 at 10:09am
|
In my mind you are fine, no need to have rock any higher, I wish my rock was a lot lower, eventually your corals will start to grow out of the water like mine are 2.5 years later although I never thought that would be an issue, another risk, even with the height you are at now is the structures falling over and damaging the tank/glass. I have seem many a tank with the rock stacked all the way to the top, leaning against the back wall, some looked ok but it's not my preference. Its also more tricky to get proper flow behind those rocks and it can trap detritus and cause nitrate issues. I will see if I can post a pic of my tank with just the rock and a comparison pic 2.5 years later and you will see what I mean about running out of vertical room. If I could do it again my rock would have been 6-8 inches lower. ------------- 65g Reef |
Posted By: relethg
Date Posted: March 17 2015 at 10:18am
|
That is what we are both thinking. We see so many tanks with it all stacked against the glass to near the top. I sure wish my tank was 36 deep, then we would have so much more to play with front to back. But a 310 is not in my near future. As it is, the center rock structure will look like it is touching the glass once water gets added. We can always add rocks. Thanks for the comments! ------------- 210 G Filled 18 Mar 15 120 G Filled 11 Jun 16 |
Posted By: Bryce
Date Posted: March 17 2015 at 10:52am
Corals actually do grow from 1" frags....just takes a few years, lol 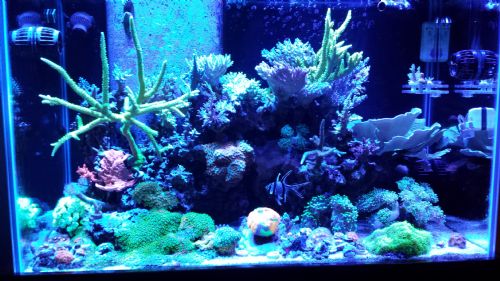 ------------- 65g Reef |
Posted By: Hogie
Date Posted: March 17 2015 at 1:54pm
|
That pic doesn't really grasp the size of that green stag. It's pretty big! I love rock and think the more rock the better and healthier the system. It seem like the more rock I can cram in a tank, the less algae/cyano problems I have. With that said, I would leave it down as well. It gives a nice, clear water column for some of the fish to swim around in up on top and looks more natural to me. I would stuff the sump with rubble rock though to get as much like rock in there as I could. I remember you just had sand in the sump on the 45. Are you going to put rubble rock down in the sump on the 210 or just leave it sand? |
Posted By: relethg
Date Posted: March 17 2015 at 2:03pm
|
I agree, you can't have too much rock. There is rock in the 45's sump you just cant see it for the microalgae. I need (want) a bigger sump for that tank. I hope to get Dion to build be a stand this year (he doesn't know it yet). I plan to put rock in most of the available space in the 210's sump. The skimmer and return sections have a lot of space. ------------- 210 G Filled 18 Mar 15 120 G Filled 11 Jun 16 |
Posted By: relethg
Date Posted: March 17 2015 at 2:05pm
|
Bryce thanks for posting the pics. It helps keep things in perspective. ------------- 210 G Filled 18 Mar 15 120 G Filled 11 Jun 16 |
Posted By: relethg
Date Posted: March 17 2015 at 6:35pm
7 Dec 14 to 17 Mar 15 from start to water. 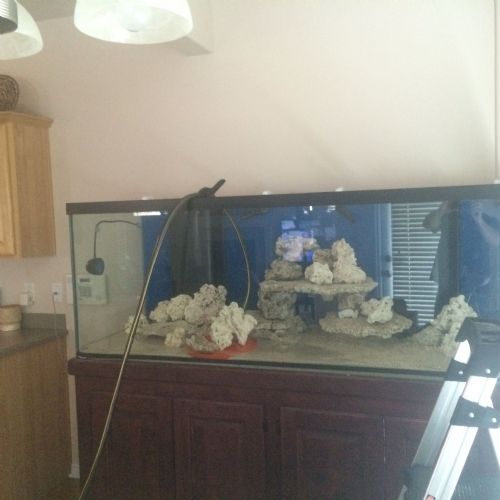 ------------- 210 G Filled 18 Mar 15 120 G Filled 11 Jun 16 |
Posted By: relethg
Date Posted: April 08 2015 at 8:30pm
Almost three weeks and added some critters.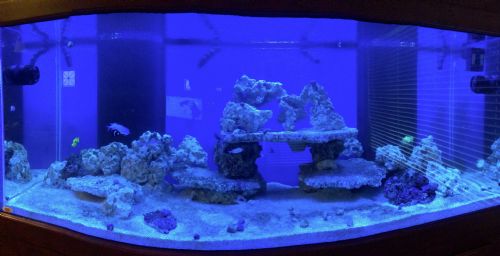 ------------- 210 G Filled 18 Mar 15 120 G Filled 11 Jun 16 |
Posted By: Marcoss
Date Posted: April 08 2015 at 9:36pm
|
Looks great! ------------- RedSea Max S400 - 90G Rimless Frag Tanks x2 - 185 Lookdown Bin |
Posted By: jdinchak
Date Posted: April 09 2015 at 8:18am
|
Nice ------------- 180G Mixed Reef Tank 170G Dart Frog Tank |
Posted By: Mark Peterson
Date Posted: April 09 2015 at 9:20am
|
Nice. I'll bet you're having fun. Aloha ------------- Reefkeeping Tips, & quick, easy setup tricks: www.utahreefs.com/forum/forum_posts.asp?TID=9244 Pay it forward - become a paid WMAS member
|
Posted By: relethg
Date Posted: April 28 2015 at 9:19am
Five weeks in and Hamilton lights are hung. I did not like the looks or the access to the top of the tank with the canopy. These are 250 W MH and 4 80 W T5s.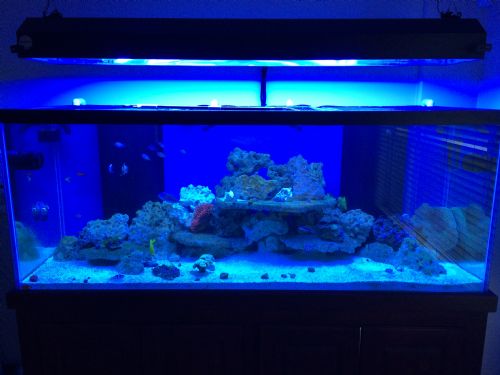 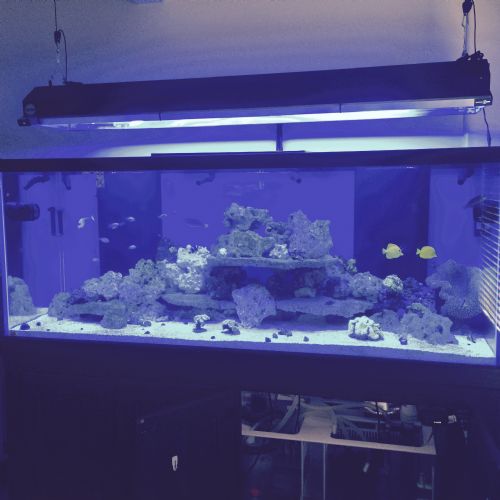 ------------- 210 G Filled 18 Mar 15 120 G Filled 11 Jun 16 |
Posted By: Mark Peterson
Date Posted: April 29 2015 at 6:58am
|
I agree with your lighting choice. ------------- Reefkeeping Tips, & quick, easy setup tricks: www.utahreefs.com/forum/forum_posts.asp?TID=9244 Pay it forward - become a paid WMAS member
|
Posted By: relethg
Date Posted: July 08 2015 at 2:24pm
It has been awhile, here is a current FTS at 3 1/2 months.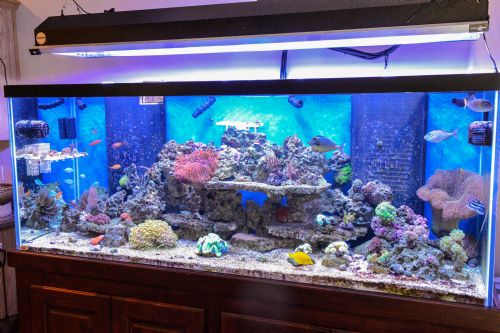 ------------- 210 G Filled 18 Mar 15 120 G Filled 11 Jun 16 |
Posted By: Marcoss
Date Posted: July 08 2015 at 2:28pm
|
That's looking very nice! You have a ton of stuff for just three months, its awesome. That toadstool looks like the size of a basketball. ------------- RedSea Max S400 - 90G Rimless Frag Tanks x2 - 185 Lookdown Bin |
Posted By: Adam Blundell
Date Posted: July 08 2015 at 3:55pm
|
Careful with the fish load. Looks like a lot of big fish for such a new tank. Adam ------------- Come to a meeting, they�re fun! |
Posted By: relethg
Date Posted: July 08 2015 at 3:57pm
Thanks, got the leather from Mark, my wife had to have it. I love my wife! ------------- 210 G Filled 18 Mar 15 120 G Filled 11 Jun 16 |
Posted By: relethg
Date Posted: July 08 2015 at 4:04pm
You are right Adam, it is a lot of fish and some big fish. Careful feeding and keeping watch on the numbers is a must. I have been able to maintain Phosphate at about .020 and nitrate at 2. The rest are good and I will be happy if I can maintain these numbers. I have been doing monthly 30% water changes too. I know I am on the edge. And may never be able to have SPS. If numbers go up I will go with sulfur reactor more than likely. Glenn ------------- 210 G Filled 18 Mar 15 120 G Filled 11 Jun 16 |